Tuesday, September 20, 2022

Interview with Joe Robson, Part 1

Photo courtesy of Tried and True Wood Finishes.


 Joe Robson might know more about traditional finishes--especially natural resin varnishes--than anyone alive. He started cooking up his own finishes for his cabinetmaking business in the 1980s, then went on to found Tried and True, which (as far as I know ) was the first VOC-free natural finish manufacture in North America, and is still going strong today. After 20 years, he sold the business to focus on his real passion: Making violin varnish. Today, these varnishes are highly sought after by violin makers. 

This summer, I drove up to Joe's workshop in Trumansburg, NY to interview him. Part 1 of our interview is general in nature, while part 2 will delve into the specifics of oil, resin and solvent--the three main ingredients of traditional varnish.

This interview has been edited for length and clarity.

Beginnings


Steve Voigt: Joe, thanks so much for agreeing to talk about your work. I read somewhere that you were a philosophy major in college. How did you go from philosophy major to running a cabinet shop?

Joe Robson: It was kind of a two sided coin, as most things are. I went to college and discovered that I had to eat. And although I had a good scholarship, I had to pay for the rest of my life. And I got started, as a lot of people do, painting houses, and that painter’s trade turned into taking carpentry jobs. By the end of college, we had built 28 houses. So I learned to be a carpenter the hard way. And the other half is I was sitting in a philosophy of religion class. And I'd been doing carpentry for a couple of years and reading about the American Shakers, and I'm supposed to be paying attention to the text but instead I'm looking at the furniture and thinking “I could do that.” I mean, I had no skills, none whatsoever that way. I could barely use a hammer and a saw at that point. But it was like a lot of other things; It was a question I couldn't answer until I tried it. And I ended up building a lot.

SV: How long did you work as a cabinet maker, and what kind of cabinet work did you do?

JR: I started the cabinet shop around 1976, I think. It was all, you know, all transitional; I was doing carpentry and somebody needed a kitchen and I said oh, I can build you a kitchen. So I built the kitchen. And then somebody else asked me for a kitchen and I started acquiring tools. And I did a lot of kitchen cabinets, I mean acres of kitchen cabinets. And probably had I been intelligent and resourceful I would have stayed in that business, probably would have retired in that business, but I wanted to be a better and better woodworker all the time. And so I sought out commissions that were beyond my kitchen cabinet work and had some failures and had some successes, and thought I should be God's gift to woodworking and that was wonderful. But it was a very difficult way to make a living in Trumansburg New York and raise children and be a dad and all those things.
So I had the cabinet shop into the mid 1990s. Then in 1992 we started Tried and True Finishes. And eventually the tools got pushed into what used to be the lumber shed and Tried and True took over and we did that for 22 years out of the two car garage next to the house.

SV: How did you get started making your own finishes?

JR: Actually we're running up on my 40th anniversary of making varnishes--it was June of 1982.
I was doing a lot of shaker furniture, all that I could get commissioned at that point. And there was a show in Washington at the Corcoran Gallery called Shaker Design. And a number of us (cabinetmakers) who were doing modern work were invited to bring a piece down to Washington, so that people who exited through the Shaker Design show would walk through a room of new work. And one of the perks of having a piece in that show was to go down to the opening, and get to look at all this furniture that I'd only seen in books or in museum settings, crawl around it, look at it, pull the drawers out. I was quite happy with my woodwork, but I knew my finish was not going to look like that 150 or 200 years.

SV: What were you using?

JR: Linseed oil, beeswax, things that were labeled linseed oil. What I realized is that they were those products in name only. And I realized that what I was using was not going to do what those finishes did. And it just kind of created an itch, and I never stopped scratching. So I started experimenting soon after that show, making combinations and trying to cook my own oils. And then about a year into that, one of the guys in the shop bought a book called German and American Varnish Making by Max Bottler. And it was just like, somebody had opened a door. For me, all of the things that I was suspicious about now had names, and processes now had names. And that just gave me the springboard to try and experiment and put these things together. And I started cooking and buying resins and processing oil, much to my financial degradation. But yeah, that was the jumping off point.

SV: Yeah, I can relate to the money pit part of it.

JR: Many times I have told violin makers that I have thrown away more varnish than all the violin varnish that's ever been made or put on an instrument or spilled by at least 10 times. But it’s been an interesting journey, because basically, in the cabinet trade and in the varnish trade, my generation thought we were reinventing the wheel. And it wasn't until I was far more into the trade that I realized the problem was World War Two, that the cabinet makers of my parents generation died in World War Two. And the varnish makers of that generation and the prior generation died and got bought out by the war because from 1933-1936, the petrochemical industry went into the American varnish industry and decimated it, they fired all the cooks like me, they replaced them with inorganic chemists, they replaced the natural materials with petrochemical resins and petrochemical solvents, and the craft part of it died. And those that didn't get fired, died in the war. So there was this huge gap in understanding and it took a while to uncover the information and then to realize that you didn't have to reinvent everything, but you had a lot of learning to do.

SV: You mentioned linseed oil and wax finishes; were you also making varnishes at this time?

JR: Yes, other types of finish to begin with, and then varnish in later years.  

SV: In 1992, you started Tried and True finishes. How did that come about? And what was it like to go from being a cabinet maker to being a finish manufacture?

JR: It came out of all this Shaker research, that I understood that these were linseed oil based finishes. But what I was buying in the can, at the hardware store, did not behave in the way that those finishes did, or last in the way that they did. And the whole market was saturated with products that were giving me headaches and making me sick. And I had to stop using them. And I started processing oils, until I found a group of oils that were actually predictable in drying, predictable in their long term use. And I started giving it away. I mean, guys would come visit the cabinet shop, leave with a mason jar full of this stuff. And you know, I'm not much of a businessman, but it hit me over the head enough times. And I sat down with my wife and I said, I can't do this by myself--do you want to do it together? So we wrote some rules and put it together and we had the first linseed oil-based, totally non-toxic finish company, probably in the world.


SV: Well, I'll just note parenthetically that although you sold the company in 2004, Tried and True finishes is still going strong.

JR: Yes, and I'm glad it's still available. I still occasionally get phone calls from customers!


Violin Varnishes


SV: How did you get started making violin varnishes?

JR: I was selling a jointer, and a local violin maker (Ben Ruth) came in to look at the jointer because he wanted something big enough to flatten cello plates on. And he noticed I was cooking varnish and said “why aren't you making this for us?” I didn't even know who “us” was. So I began making violin varnishes very soon after we started Tried and True. Profit margins were nice, and I liked the people I was working with. But it was just a sideline.

SV: And that was just from word of mouth from the violin maker who came to buy the jointer?

JR: Yes, he introduced me to his world, and it kind of went on from there. And after twenty years of making Tried and True, we were ready to sell. Twenty years is a long, long time to be throwing five gallon pails of oil around!

SV: What are some of the ways in which violin varnish  differs from furniture varnish?

JR: It's mostly a matter of stability and hardness, but that stability and hardness goes back to the way the varnish is made. When Antonio Stradivari, the greatest maker of all time, was working, the modern resins were copals and amber. They were the hit of Europe at the time. In the 1720s, there were two cabinet makers in France, the Martin brothers, and they became varnish makers and cabinet makers to the king. Some of the furniture is still in the palace, as perfect as the day it was made. Stradivari and his predecessors in the Amati family were exposed to those varnishes. They could have gotten on that train and ridden it, but they didn't. They stuck with tradition.
See, violin varnishes are poor quality varnish that relate mostly to what in the 19th century was called chair varnish. In chair manufacturing, they'd have these long tables, and the guy with a chair would stand at one end, and the varnish would spray up at the table. And they would just turn the chair quickly through all of these sprays and set it down to dry at the other end of the table. And these were rosin based varnishes that dried fast. Yes, they were chippy. And yes, they didn't hold up to sweat, but they were pretty, and they got done fast. And that transition between the furniture world and the violin world was something for me to understand. Because what furniture makers saw as a fault, violin makers saw as a feature.

SV: That's an interesting comparison. When you say it’s poor quality varnish, what you mean, if I understand you correctly, is that it's built to wear out.

JR: Built to wear in a particular way, at a particular rate for particular reasons. They all wear in different ways. But violin varnish at its best is a very narrow road. And it doesn't follow the rules of commercial varnish making.

SV: For someone who's not in the violin varnish world, can you describe, in general terms, the multi-step system that you and other people use for varnishing a violin?

JR: Well, we start with the ground. And there are many types of those.

SV: What is the purpose of the ground?

JR: Ground in its least form seals the wood, particularly with spruce, so that the varnish doesn't over absorb and give you an uneven finish. But beyond that, there are properties, particularly of the Cremonese instruments, that are very brilliant. And it has to do with how we control the light that goes into the wood. So beyond the practical there is an artistic factor there about how much sparkle can we get underneath the varnish before we start. I mean, there are optical properties of these great instruments that basically have to be in place prior to varnish to get the right look.
How the old instruments were originally done, nobody knows. And for me, personally, I don't really care. It's interesting. But what I'm looking for is results.  So, the degree or the amount of light that gets into the wood and gets bounced around and comes back is a factor in how the varnish behaves, once the varnish and color are on. So you have to be able to control that prior to varnishing, if these are the effects you're looking for,

SV: How does the ground differ from a varnish in terms of what it's made of, or its properties?

JR: Well, some people use varnish for the ground. Some people will use a protein like egg white, or casein, the stuff that hide glue is made out of. Many proteinaceous materials can be used as a sealer. Some people use shellac, or water glass. I mean, it's an endless, endless discussion.

SV: Is there a difference between a ground and a sealer?

JR: What remains popular with some people in the violin world is what’s called a mineral ground, basically something like Plaster of Paris or a mixture of minerals made up in a paste with varnish that goes on like toothpaste. Not that much different than the way one would seal oak on an oak floor. You know, you put this paste on, you let it dry, you scrape it off, and what's left in the woods seals up the pores.


Joe Robson's Ground.


SV: What comes after the ground?

JR: In my own work, I'll generally put down a coat of clear varnish after the ground. Because I think that the light reactions are better, and closer to what I'm looking for, like the old instruments, if there's a clear layer down first. And then we'll apply color, either colored varnish or pigments or whatever you choose to color the varnish. And generally that's two or three, or maybe four applications, again, depending on your style and your experience. And then a coat of clear over that. So the color varnish ends up being sandwiched between two layers of clear.

SV: Let’s talk about the color layers. You’ve written about two ways you make colored varnishes. The first way, which seems to be widely used by violin makers, is to cook resins, primarily colophony but also sandarac, until they lose 75-90% of their weight, which gives the varnish a deep, reddish brown color.
The other way, which you described in the article “Scarlet Fever” (The Strad, September 2018), is to attach a cochineal lake to linseed oil. Can you tell me a little about that? (Note: Cochineal is a red dye derived from an insect. A lake is a dye that has been precipitated onto a substrate such as alum to make it insoluble in water).


JR: My claim to fame, if you can call it that, is that I figured out how to attach a lake to linseed oil without making a particulate. And that is the root of my colored varnishes. It's a process that I figured out, but I didn't invent it. It's been around for centuries, but nobody else does it, at least not in public, not that I know of.

SV: What did you mean when you said “without attaching a particulate”?

JR: I'm making a lake which is truly a lake in all other ways, except that instead of becoming crystalline, it attaches itself to the linseed oil.

SV: So you're not using alum or something like that to precipitate a powder?

JR: I'm using all of the same materials and the same process, but I’m doing it in a way which does not precipitate a crystal; it precipitates the coloring process onto the linseed oil molecule. So it's a transitional process. It's always liquid, and it's always attached to the oil. So you get a very intense color, but a translucent medium with no particulate.

SV: And how does the result differ from other processes, like cooking resins for color?

JR: You get the red color, you just don't get the right optical properties of the varnish. Other approaches, like making rosinates, make beautiful varnishes, but they don't do the things that the Stradivari varnish does optically.

SV: I think in the article you described these other approaches as monochromatic.

JR: Yeah, monochromatic, more metallic in their color. The varnish takes on the optical properties of the resin, so there's a metallic sheen to it. When you attach the lake to the oil, you get that softer, multifaceted reflection that you get from oil.

SV: Reconstructing Stradivari’s varnish, as you believe you’ve done here, seems like a monumental achievement. How long did it take you?

JR: It was years of failure, Steve. I'm trying to remember how many years at the moment, but it was a long time ago. I understood how to do this when I reached the point in the Stradivari research where I finally had usable materials to work with, in terms of scientific and historical information. And from that point forward, it was still seven years between having the information and having a varnish that I would be willing to put up in public.

SV: That’s an amazing amount of persistence. Are you no longer cooking resins for color, now that you have this other process?

JR: Oh, no, I'm doing it all.

SV: So why would someone choose to buy your colored resin varnish, versus buying the cochineal varnish?

JR: Well to start, there's a big price difference. But the other factor is that violin makers have their own ideas. And I'm a tool guy, and I've been providing tools to violin makers for over 20 years. So when somebody develops a method, they want to come back to me and be able to buy the jars that they bought last time, and have it all work. There are a lot of people who aren't particularly interested in the historical correctness of their varnish–they do things their own way artistically or for whatever reason. And then there are people who follow that crazy little narrow road to Cremona, and those are the people who will latch on to the cochineal varnish and stay there.


Joe's cochineal varnish.

General Varnish Making


SV: Today, the dominance of synthetic varnishes is such that most woodworkers will go their whole lives without ever using a traditional oil resin varnish. What are they missing? What qualities do traditional varnishes have that are absent from synthetic varnishes?

JR: Synthetic varnishes are basically plastics dissolved in solvent. They're not cooked resin. So the optics are completely different. The clarity, the depth of reflection, the ability for a varnish to pull varied colors out of the wood, is completely lost. Synthetic varnishes are basically made like paint–their effectiveness is based on opacity rather than clarity. So the image that always comes to my mind is taking an old piece of Plexiglas from your storm door, and running it through a grater and taking that stuff and dissolving it in mineral spirits. And then maybe you dump a little bit of raw oil into it, it's probably raw tung oil, which doesn't really like to be there with the mineral spirits, but it gets in anyway. And you mix it up, and you put it in a can and you call it varnish. I mean, this is what happened to the industry in the 1930s. This is when cooking varnishes went away and inorganic chemists took over the game. And it was basically to supply World War Two with cheap varnish.

I think that it's a true tragedy in our trade as woodworkers, because the experience of actual finishing is a tremendous addition to the art that we do. This bench (motions to the beautiful old workbench we’re sitting at) came out of my wife's great grandfather's house. That house was finished in 1907. The varnish in the house was two coats of shellac, and three coats of copal varnish. And the day they sold the house the finish looked as good as the day they put it on. So the durability factor is huge. But look, I'm in this for the optics, and what you draw out of your work with a real oil varnish can't be done with plexiglass and mineral spirits.

I'm working with a guy out in Ohio who is a great mandolin maker and he's restoring a 1920 Lloyd Loar mandolin. And he called me and said, “this is what it looks like, tell me what they did.” Well, somebody sprayed this thing with one of those early pre catalyzed lacquers. And they get milky, and they have no adhesion. And that's a big difference between modern and old varnishes, the adhesion factor, and he was able to pull that new laquer off with a razor blade and just scraping. And under it was the copal varnish that they used on the older instruments. This is damn tough stuff. And we still polished it after that. I mean, I could keep going on about this subject, because I just think it's a sorry thing that the woodworkers of today don't have access to these varnishes.

SV: Do you cook the varnish in cast iron?

JR: I cook the resins in cast iron, and I cook the varnish in stainless steel, but the cooking of the varnish is such a tiny part of the procedure. I mean, at best you're talking 20 minutes.

SV: Really?

JR: Yeah. My theory behind all of this is the faster you bring the resin and oil together and have the varnish made, the more clarity you get out of varnish, the more translucency you have. The longer you cook, the less translucent the varnish becomes, and it may have other qualities which you may or may not like. But if you're cooking for clarity, bring your materials to the point where they want to be together as fast as possible, and be done with it. The preparation is key; there's far more time and effort put into the preparation of the materials than the actual varnish making, the actual varnish making is almost an afterthought.

SV: Wow. That's not how I was thinking about it. That's quite a revelation.

SV: Is a thermometer necessary?

JR: I think it's necessary to learn. One big factor is if you have pine resin or colophony that was harvested in North America, it has abietic acid in it. And for linseed oil and abietic acid to combine properly, they have to hit a minimum of 150° C. See the old trick about putting a goose feather in it, goose feathers melt at 150° C. So you need to learn where those thresholds are. The only time I use a thermometer now is when I'm preparing my oil. Because I want to see exactly where the temperature thresholds are. And I'm preparing it in fairly large batches, probably three gallons at a time. But for preparing resins, I don't use it at all anymore. Because again, every batch is slightly different. So I operate more by smell and sight. As the resins cook, they will change. The odor will change and the color of whatever's coming off as smoke or moisture will change and those are far better controls than temperature, because again, materials may start off in a slightly different place. So when the smell changes, you know what to do. When the smoke changes, you know what to do.

SV: Learning to make varnish can be daunting. What qualities enable one to have some success at it?

JR: Observation, the willingness to fail, and a certain amount of curiosity are all important. I would say the ability to observe accurately without prejudice is probably most important.

SV: Without prejudice. That's a good phrase.

JR: Yeah, you know we all have preconceptions we bring to the process. The fewer of those you have, the more likely you are to succeed.


Sunday, September 18, 2022

Refining Linseed Oil


Linseed oil in mid-wash. The stuff in the middle is mucilage, and you don't really want it in your oil.


Note: This post originally had a section on making varnish. I decided to pull the information because I felt that it was leading people in the wrong direction, and the varnishes I recommended weren't ideal. If you're interested in making your own varnish, please see my post "Making Copal varnish."

To make varnish, you need good oil. The procedure below describes how I prepare oil for varnish making. But this oil doesn't have to be used only for varnish--you can use it as a standalone finish, or combine it with wax for a "soft wax" finish. It will dry roughly twice as fast as raw oil, and will be significantly less yellowing over the long term.

 Refining Oil

The following is a pretty simple method of washing oil. It takes a relatively long time, but requires very little effort. For a comprehensive look at oil washing, see Tad Spurgeon’s book Living Craft, available as a download in the previous post.

 Stuff you’ll need:

  • Cold pressed linseed oil. Avoid most oil sold as flax oil in health food stores, and avoid all bargain basement oils available online. The Swedish cold pressed oils (Ottosson, Allbäck) are very good. I especially like Ottosson, but it has to be raw; do not use boiled linseed oil. 
  • Water. Tap water is usually fine for this method, especially if it’s relatively soft, but if it’s hard it may be too aggressive. If you have difficulty getting the oil and mucilage layers to separate, try spring or distilled water.
  • Canning or kosher salt. Look at the label and make sure it’s just salt, with no extra ingredients like anti-caking additives. Diamond Crystal brand is good and cheap.
  • Screw top jars (Ball jars work great) and a bulb baster.

Washing: Fill a jar three-quarters full with two parts water, one part oil, and a cup of salt for every 16 ounces of oil. Screw the lid on tight and shake vigorously for one to two minutes, then let the jar sit undisturbed, on a sunny windowsill if possible. Perform the shaking procedure three times per day.

After the first shaking, the oil and water will separate within a few minutes. But after several rounds of shaking, a mucilage layer will form in the middle. With more rounds of shaking, the mixture will separate more slowly, and the mucilage layer will grow larger. This may take a few days, or it may take a week: It depends on the oil and the water. If you reach a point where the mucilage takes a long time to separate, change the water. If not, change the water after a week.

To change the water, use a bulb baster to transfer most of the oil to a clean jar. To remove the last couple ounces (you can’t do it with the baster), gently pour water into the jar until it’s completely full. Wait a few minutes for the remaining oil to separate,, then use a spoon to remove as much of the remaining oil as you can. Try to avoid picking up mucilage, but don’t worry if you get a little–you don’t need to be really careful until the final wash.

An alternative method of removing the oil is to simply freeze the jar, then pour off the oil. There are pros and cons to each method: Freezing takes longer and not all the mucilage may freeze, but it’s much less fuss. Jars may crack after repeated freezing cycles, so you need to inspect them carefully.

After you’ve removed the oil, repeat the whole process. The second wash may require fewer rounds of shaking to reach the point when the water needs to be changed. Then do a third and fourth wash, but do not use salt for these last two washes. After the final wash, transfer the oil to a clean jar, being careful to avoid picking up any mucilage. About a third of the oil will be lost during the washing process.

Optional Pre-wash: Before the first wash, you can do a pre-wash with water and vinegar. The vinegar helps the mucilage separate more easily in subsequent washes. To 16 ounces of oil, add 3 ounces water and 1 ounce apple cider vinegar. Shake together for two minutes, allow a few hours or overnight to separate, then remove the oil. 

Safety note: Always dispose of rags soaked with linseed oil safely--there is a small but real chance they could catch fire as they dry. I like to spread them out, weighted down with pebbles, until they dry thoroughly.

Troubleshooting: If the mucilage is separating very slowly, try gently spinning the jar for about thirty seconds. Repeat every few hours. A stubborn emulsion can sometimes take several days to fully separate. If it’s not separating at all, put the jar in the freezer overnight (make sure it’s not completely full, and don’t screw the lid on too tight). Take it out the next day and let it thaw completely; this will break the emulsion. After the emulsion breaks, change the water; if you’ve been using tap water, try distilled or spring water instead.

Clearing: After the last wash the oil is clean, but still turbid due to residual water. The safest and easiest way to clear the oil is to cover the jar with cheesecloth, and let it sit in front of a sunny window for a few days. When the oil is completely transparent, it is ready to use–just decant it to another container, leaving any residual water behind. 

You can also clear the oil with low heat, but be aware that this is potentially quite dangerous. You must heat the oil slowly to the temperature of boiling water (212°F/100°C); do not exceed this temperature by more than a few degrees. If you heat the oil too fast or too hot, the boiling water, trapped on the bottom, may erupt in jets, causing serious burns. You will need to monitor the temperature carefully, and if there is much water, it can take a long time to evaporate. Even when done correctly, this method is messy–the water makes the oil spatter, covering everything within a few feet with a fine, greasy spray. I much prefer the first method.

When the oil is cleared, you will have a raw, refined oil that greatly exceeds in quality anything you can buy. It can be used anywhere you’d normally use raw linseed oil, but it will dry considerably faster. However, there is still one more step before we can use it to make varnish.

Breaking: This step eliminates impurities that cannot be washed out, and can coagulate when the resin and oil are combined.

Stuff you’ll need: 

  • Electric hot plate. For this step, almost any cheap hot plate will work. 
  • Thermometer. Infrared thermometers are cheap, can read very hot temperatures, and don’t require immersion, which comes in handy when melting resins. Immersion thermometers are more accurate, but good ones are expensive and can’t read the high temperatures needed for some resins. Get both if you can afford it; if not, get an infrared.
  • Stirring rod (glass or stainless steel is best). 
  • Saucepan. For oil, and for rosin varnishes, a cheap, stainless steel 1 quart pan will work well. 

Heat the oil (remember, outside, on an electric hotplate) to 450°- 475°F (230° - 250°C), and hold for thirty minutes. If you did not use heat to clear the oil, watch carefully as the temperature reaches 212°F/100°C, and if you see bubbles, hold the temperature until the bubbles disappear. Monitor the temperature carefully; if you go much above 500°F, linseed oil starts to break down, so avoid getting it too hot. You may actually see the “break,” which will appear as an opaque cloud that suddenly dissipates; but you may not–it happens pretty quickly. Safety note: Don't walk away while the oil is heating. The temperature can climb pretty quickly, and if it climbs high enough, the whole thing could catch fire.  

After heating, the oil will dry faster, and it will also appear much darker than before. However, if you put a drop on a piece of glass and spread it out, it will be completely clear. If you apply it to wood, it will look no darker than before it was heated. The color of oil is fugitive; how it looks in a jar has almost no relationship to the color of a thin film.

Congratulations; you're ready to make varnish with this oil, or use it however you like!


Sunday, September 11, 2022

Tad Spurgeon, Linseed Oil, and Living Craft


 Note: If you're looking for Tad's PDF on oil refining, or his book, they're posted at the bottom.

 When I first started researching traditional varnishes and oil finishes, one name that kept popping up was Tad Spurgeon. He's well known in the art world, but I suspect few woodworkers--with the exception of violin makers--have heard of him. His website is regrettably shutting down at the end of this month (9/22), so I wanted to give him a proper sendoff, and also post some materials (with Tad's permission) that readers can download and explore if they're interested.

Tad is a very accomplished painter, but he's perhaps best known for having almost single-handedly  revived the ancient practice of washing linseed oil. You are probably wondering why on earth anyone would want to wash linseed oil. There's a long answer…but the short answer is that a washed oil dries in about half the time of raw oil, will yellow or darken less, and be far less susceptible to mold or mildew. So if you are using oil as a primary finish, or using it to make varnish or paint, your results will be better.

Spurgeon started washing linseed oil because he wanted to make his own paint. Today, most artists go to an art store to buy paint made in a factory, but before the 20th century, artists generally made their own paint. Unsatisfied with the answers he got from 20th century writers, Spurgeon turned to sources such as the 17th century De Mayerne manuscript, and to a pair of important 19th century texts by Eastlake and Merrifield. He found that prior to the 19th century, artists typically used cold pressed, hand washed oil to make paint and varnish their canvasses, and that many of the paintings had lasted centuries without appreciable darkening or deterioration. But in the 19th century, as the use of hot pressed, industrially refined (or unrefined) oil proliferated, darkening became common, and by the 20th century, artists' textbooks treated it as a given. 

Over a period of years, Spurgeon experimented with the oil washing methods described in the older sources, and rigorously recorded his results. In some cases he was able to systematize older methods and make them more efficient, and he also developed some entirely new methods. He also explored--and again thoroughly tested and documented--related methods of processing such as heat treating, oxidizing, and aging in sunlight. All of this is laid out clearly and concisely in the Oil Refining PDF at the bottom of this post, and it's well worth checking out.

For woodworkers, the linseed oil research is the most directly applicable part of Spurgeon's work, but for him it was just the tip of the iceberg. In his book Living Craft, he reconsiders the totality of the painter's materials in the same vein, and seeks to reestablish a craft based on handmade materials, in sharp contrast to the modern practice of using purchased materials. 

I'm a woodworker, not a painter, but Spurgeon's work has influenced mine in a number of ways. First, there's the idea that using handmade materials changes your relationship to the craft. As a toolmaker, this notion already had resonance for me--I've made most of the planes, floats, and other specialty tools that I use in my daily work. But formulating my own finishes out of hand-processed oils and natural resins added a new dimension to the work: Finishing becomes a much more integral part of the process, and one that has more meaning, when you're not just buying a bottle of mystery liquid at the hardware store and slapping it on.

Second, Spurgeon serves as a model for how to approach research as a craftsman, rather than as a scientist. His tests of materials don't pretend to be formal scientific experiments--and they're the better for it. Over the years, I've seen many attempts to do scientific tests related to woodworking--on finishes, on tool steels for chisels, on planing angles, you name it. They usually fall flat, either because the designers lack expertise in the craft, or because they try to remove any trace of the human hand, in a misguided effort to ensure objectivity. Building a machine to chop particleboard with a chisel, for example, may seem more objective than having an experienced woodworker chop dovetails in maple all day, but it's not very useful for telling us about the feedback the chisel gives the hand, about how difficult it is to resharpen, or how well the tool integrates into normal workflow. In a similar vein, tests on linseed oil that use advanced imaging or analysis methods may look impressive, but if the experimenter doesn't have real experience using and processing the oil, and just uses any old oil off the shelf, the test is likely worthless, because not all linseed oils are the same.

Which brings me to one of Spurgeon's most important insights, which is that many basic materials that we take for granted are fundamentally unlike their historical versions. Linseed oil is a great example, but there are many others…turpentine, for example. That noxious substance that you buy at the hardware store is so unlike traditionally made turpentine that it doesn't deserve to be called by the same name.

Spurgeon isn't the only one to discover this: In many ways, his thought parallels Michael Pollan's writing about food in The Omnivore's Dilemma, In Defense Of Food, and elsewhere. And that's not a coincidence. As Pollan shows, the industrial system of production that has developed since the late 19th century has fundamentally transformed our food, from flour and tomatoes, to chickens…and the same is true of linseed oil and turpentine. The food industry and the coatings industry are two sides of the same coin, and both are built, as Pollan might say, on the same, slowly sinking sea of cheap petroleum.

That's a depressing thought, but as Spurgeon dryly notes in Living Craft, we still have opposable thumbs. So, if you want to taste how different a real tomato is from the industrial crap at the supermarket, get a Brandywine plant (or some other heirloom variety) and grow it. And if you want to experience how different good linseed oil is from the crap at the hardware store…well, download Spurgeon's writings below, and get cracking.

Refining_Linseed_Oil.PDF

Living_Craft.PDF


Monday, September 5, 2022

The Search for the Perfect Finish

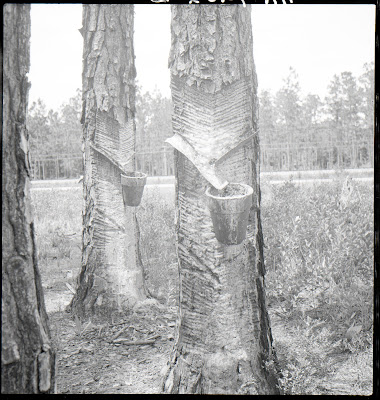
Turpentine trees, Florida, 1936. Courtesy: Library of Congress.

There is no perfect finish, of course. But the search for the right finish for the traditional wooden planes I make has turned out to be far longer than I imagined, and led to places that I never would have expected. Most surprising of all, it's opened the door onto a whole world of pre-industrial craft that I didn't even know existed.

 This month, I have an article coming out in Mortise & Tenon Magazine titled Reconstructing the Varnish Maker's Art: Traditional Finishes for the 21st Century. The article represents one strand of my journey: A deep dive into the history of traditional finishes, especially natural resin varnishes. So in this post, I want to give some background context, and shed some light on how I went from perusing the shelves at my local hardware store to poring through 17th century manuscripts and cooking resins at 600° F on a hotplate in my driveway.

My earliest planes had with simple oil finishes, but when I started making planes for sale, I realized I needed a more durable and protective finish. For a while I used Minwax Antique Oil, because it's popular among planemakers, but I quickly got tired of it. Like so many synthetic finishes, it looks plasticky to me--which makes sense, because the resin component is almost certainly some sort of plastic. And the application process is a pain in the ass. So I moved on, searching for something that would look better, and hopefully be a little less toxic.

For a while, I used polymerized tung oil, and that was okay. But you really need to sand between coats--tung oil never leaves a completely smooth surface. The resulting surface is matte, and I like matte, but this was a bit too matte even for me. So I felt like I needed to wax after buffing the last coat, and that was a pain in the ass too. Plus, you need to keep waxing or the matte surface returns, and over the long haul the tung oil seems to get more opaque.

One other thing I didn't like about tung oil was the way it feels, and that was a problem with the next finish I tried: Osmo. I was talking to Don Williams (renowned finishing expert and former Smithsonian conservator) about this, and he brought up the term "mouth feel," which is apparently used in the food industry a lot. I understood his point right away. I guess we could call it "hand feel," but whatever it is, I didn't like the way Osmo and other hard wax finishes felt. And while it's durable, it's not as durable as some of the other finishes I had tried.

The last commercial finish I used was Birchwood Casey Tru-Oil, and I used it for quite a while. It's a lot like polymerized tung oil, but because it's mostly linseed oil, it doesn't leave that rough surface. It's easy to apply, durable, and looks good, though the look was never quite what I was looking for. And it can dry a little too fast--using it on a hot summer day can lead to a lot of extra work, buffing and reapplying. But still, it was the best commercial product I could find, and I finished a lot of planes with it.


 Meanwhile there was a memory, more than 20 years old, that kept nagging at me. When I first started woodworking, I read a Fine Woodworking article about varnish. It said there were three main types of resin in varnish: Phenolic, alkyd, and polyurethane. I didn't know much about these substances, but I figured they were synthetic, and I wondered how people made varnish before they were invented. I finally started to get a hint of an answer when I happened on an article by the aforementioned Don Williams that pointed me in the right direction. Another phone call to Don followed, and pretty soon, I was doing crazy shit, like washing linseed oil…


and cooking things like Congo Copal resin…


to make real varnish that comes from plants and trees.


Many batches of varnish followed, and I had test samples strewn all over my shop. It's one thing to make varnish; it's another thing to make varnish that you'd rather use than any commercial product. You have to have a high tolerance for failure.Eventually though, I got to a place I was pretty happy with.

Here's a view of a test sample: Tru-Oil in the foreground, Copal varnish in the back. 


Here's another view, this time with Copal in the foreground.


The Copal is a bit darker, though the difference appears much smaller when viewed straight on. It's a lovely color, but what's more remarkable is the difference in reflectivity. With two thin coats of Copal varnish, the wood doesn't really look like it has a film on it; instead, it appears that the shine is coming from the wood itself. Which is what I was after all along.

Anyway, there is more in the Mortise & Tenon article, so have a look if you're so inclined. Yes, it costs money, but it's well worth it--there are many other terrific articles, and Josh and Mike do a great job with the visuals.

I'll have some more posts on the subject this month, including recipes and an interview with the guy who knows more about this stuff than anyone alive.


Saturday, August 27, 2022

New Planes on the Horizon…

 When I started Voigt Planes seven years ago (wow, it does not seem that long), I thought I'd be rapidly adding all sorts of new models, but it hasn't turned out that way. Aside from rabbet and dado planes, I've mostly stuck to my basic lineup of bench planes. But this summer I've been working on a couple new models that I feel very good about, and they should be rolling out pretty soon.

First is a panel raising plane. I'm calling this my "Yankee Panel Raiser,"because it's based on planes by the second and third generations of "Yankee" planemakers, who worked in rural New England towards the end of the 18th century.


Excuse the bags of fiberglass insulation in the background--I'm insulating the shop.


The plane is very basic for a panel raiser--there's no nicker, and no separate flat area for the tongue. There are other panel raisers out there with all the bells and whistles, so I wanted to make a simple, robust design that's historically accurate.


The offset handle is quite comfortable.


The other new plane I've been working on is a slide arm fillister. I've made a couple prototypes of side escapement fillisters (the kind with a fence that screws to the bottom), and they worked fine, but they weren't something I was excited about producing. This one's different. It's essentially a skew rabbet plane with a fence that's secured with wooden thumbscrews. This style was quite popular in the U.S. in the late 18th/early 19th centuries, despite the fact that it was about twice the price of the simpler side escapement fillister.

One advantage of this style is that it's faster and easier to adjust the fence.


The other thing is that side escapement fillisters can be a bit finicky in terms of how they eject the shavings. That's because the skew actually forces the shaving in the wrong direction, so the shaving has to turn in order to exit the escapement, which can lead to clogging. You can reverse the skew--and some makers do that--but then the plane will have a tendency to be pushed away from the cut. With the skew rabbet escapement, however, the shavings eject very efficiently.


Here's a closeup of the escapement:


I hope to have these planes up on my website this Fall. In the meantime, if you have any questions about either of them, drop me a line.

Coming up in the next few posts, I'll be exploring the rabbit hole of historic natural varnishes that I've fallen into the last couple years. Stay tuned!


Saturday, February 6, 2021

Ruminations on Social Media in Woodworking


My first Instagram post, from 2015

 If you read my blog, chances are you saw Mortise and Tenon's recent post "Keep it Real," in which they announced their intention to abandon social media (Instagram, Facebook, Twitter). The post generated a lot of conversation, especially on…wait for it…social media. I found it thought provoking, and much of it rang true, especially this paragraph:

I eventually got myself down to 15 minutes per day of social media usage: enough for one post and a few responses. It felt so good. I was regaining my life back. In the meantime, however, I noticed Facebook and Instagram moving toward greater and greater control of their users' experiences. It’s no secret that these companies design their platforms to be as addictive as possible. Even many stable and well-balanced people, who are otherwise quite resilient individuals, find themselves sucked into the social media vortex. The hasty skimming and instantaneous reactions that these platforms foster leave no room for reflection within the apps themselves. If you don’t respond instantly, the post will fade away into your feed, likely never to be seen again. Despite the fact that, as of this writing, it is still possible to manually search for that inspiring photo on the author’s page, how often do we do this? In reality, 99 percent of the time we experience the app as it was designed to be experienced: as endless scrolling, feeding emotion-driven gut reactions.

I've never belonged to Facebook or Twitter, but for five years I've regularly posted on Instagram. When I started, it felt like there was a real community of hand-tool oriented woodworkers. I had lively debates with fellow toolmakers; I made some real-life friends, and customers found me. Most importantly, I had total control over the content I wanted to see. Back then, Instagram's feed was chronological, there were no ads, and no "suggested" posts (unless you went looking for them). 

But since Facebook bought Instagram, they've methodically transformed it into what my wife calls "Facebook in pictures." An algorithm determines the order of the posts I see, ads are everywhere, "suggested" posts are forced on me, and finding older posts to view again has gotten to be more and more of a chore. It's simply not much fun any more, and I regularly feel manipulated--which makes sense, because that's really the goal of the platform now.

At the same time, there's some irony here. My business has certainly benefited from Instagram exposure, and Mortise and Tenon Magazine probably wouldn't even exist in its current form without social media: Joshua Klein, I would argue, built that publication largely on the strength of his social media presence.

So, I'm not quite ready to walk away from Instagram completely, but it's time to recognize that things have changed. The idea of an Instagram-driven community of hand-tool lovers was always a bit of an illusion--the people preaching the loudest about community were always focused on building their careers as "influencers"--but now the illusion, for me at least, has been completely stripped away. I'll continue to post occasionally, but I'm going to gradually disengage and minimize the amount of time I waste there.

At the same time, I plan to re-center this blog as the primary way I communicate with the woodworking community. For the new year, I've updated my blog roll, I've added an RSS feed gadget in the top right corner (so you can add me to an aggregator like Feedly if you want), and most importantly, I'm posting more often.

Blogs seem pretty old fashioned these days, and they can't compete with the real-time, frenetic pace of social media. But they offer some clear advantages. Ideas can be explored in more detail, and blog entries are easy to find again, unlike social media posts. There are no ads (at least on my blog, and most that I follow). There is no additional content that is forced upon you. For all these reasons, I wouldn't be surprised to see blogs flourish again, as more people are turned off by the ever-more oppressive manipulation of social media. 

What are your thoughts? Feel free to chime in below.


Saturday, January 23, 2021

…what I'm up to so far in 2021


The new Bridgeport


2020 ended on kind of a down note--my octogenarian mom took a spill, and I ended up taking about 8 weeks off to travel back to the midwest to help her recover, and ultimately bring her back to PA to stay with us for a while. The pandemic made all of this much tougher, but I won't complain because so many people are hurting so much worse. I'm in good health and no one close to me is dead or dying of Covid, so I feel very lucky.

In any case, these travails doubled my current lead time for planes, to about 6-7 months, so that's something to keep in mind if you're planning on ordering. So far, all my customers have been incredibly understanding and nice about this--yet another thing to be grateful for.

2021, on the other hand, started with a bang! I've been looking for a mill for a couple years, and I finally got one in the first week of January. Everything just fell into place very quickly.

The mill (pictured above) is a mid 1960s Bridgeport J-head. Most unusually, it has a single phase motor, which makes life a lot easier. It also has DRO and came with a vise, full set of collets, and a bunch of accessories. Quite a deal!

Having a mill will allow me to make more of my irons and hardware in-house, and will speed up production of my planes a little bit. It's not a magic bullet--no machine is, for planemaking requires a ton of handwork no matter how you slice it--but it will help me towards my goal of getting more planes (like plows and fillisters) into production. It's also going to be a lot fun for me: I worked my way through grad school in a machine shop, and a Bridgeport J-head was the first mill I ever used…so this is a bit like having an old friend in the shop.

Moving the mill--which weighs about 1900 pounds--was kind of an adventure. I called up some professional machine riggers, and the only quote I got was for over two grand to move the machine 55 miles down the highway. Forget it. I rented a truck from Enterprise and a drop-deck trailer from Sunbelt, and moved it myself. The key was to use a pry bar and shims to gradually raise the mill up on 2 x 4 blocks, then slide pieces of black iron pipe underneath. On a level surface, it's easy to roll the mill on pipe.


The next time  try this, I'll get a come-along--it would have, ahem, come in handy for non-level surfaces. I was able to use a ratcheting strap for the same purpose, but the real thing would have been nice.