Sunday, September 11, 2022

Tad Spurgeon, Linseed Oil, and Living Craft


 Note: If you're looking for Tad's PDF on oil refining, or his book, they're posted at the bottom.

 When I first started researching traditional varnishes and oil finishes, one name that kept popping up was Tad Spurgeon. He's well known in the art world, but I suspect few woodworkers--with the exception of violin makers--have heard of him. His website is regrettably shutting down at the end of this month (9/22), so I wanted to give him a proper sendoff, and also post some materials (with Tad's permission) that readers can download and explore if they're interested.

Tad is a very accomplished painter, but he's perhaps best known for having almost single-handedly  revived the ancient practice of washing linseed oil. You are probably wondering why on earth anyone would want to wash linseed oil. There's a long answer…but the short answer is that a washed oil dries in about half the time of raw oil, will yellow or darken less, and be far less susceptible to mold or mildew. So if you are using oil as a primary finish, or using it to make varnish or paint, your results will be better.

Spurgeon started washing linseed oil because he wanted to make his own paint. Today, most artists go to an art store to buy paint made in a factory, but before the 20th century, artists generally made their own paint. Unsatisfied with the answers he got from 20th century writers, Spurgeon turned to sources such as the 17th century De Mayerne manuscript, and to a pair of important 19th century texts by Eastlake and Merrifield. He found that prior to the 19th century, artists typically used cold pressed, hand washed oil to make paint and varnish their canvasses, and that many of the paintings had lasted centuries without appreciable darkening or deterioration. But in the 19th century, as the use of hot pressed, industrially refined (or unrefined) oil proliferated, darkening became common, and by the 20th century, artists' textbooks treated it as a given. 

Over a period of years, Spurgeon experimented with the oil washing methods described in the older sources, and rigorously recorded his results. In some cases he was able to systematize older methods and make them more efficient, and he also developed some entirely new methods. He also explored--and again thoroughly tested and documented--related methods of processing such as heat treating, oxidizing, and aging in sunlight. All of this is laid out clearly and concisely in the Oil Refining PDF at the bottom of this post, and it's well worth checking out.

For woodworkers, the linseed oil research is the most directly applicable part of Spurgeon's work, but for him it was just the tip of the iceberg. In his book Living Craft, he reconsiders the totality of the painter's materials in the same vein, and seeks to reestablish a craft based on handmade materials, in sharp contrast to the modern practice of using purchased materials. 

I'm a woodworker, not a painter, but Spurgeon's work has influenced mine in a number of ways. First, there's the idea that using handmade materials changes your relationship to the craft. As a toolmaker, this notion already had resonance for me--I've made most of the planes, floats, and other specialty tools that I use in my daily work. But formulating my own finishes out of hand-processed oils and natural resins added a new dimension to the work: Finishing becomes a much more integral part of the process, and one that has more meaning, when you're not just buying a bottle of mystery liquid at the hardware store and slapping it on.

Second, Spurgeon serves as a model for how to approach research as a craftsman, rather than as a scientist. His tests of materials don't pretend to be formal scientific experiments--and they're the better for it. Over the years, I've seen many attempts to do scientific tests related to woodworking--on finishes, on tool steels for chisels, on planing angles, you name it. They usually fall flat, either because the designers lack expertise in the craft, or because they try to remove any trace of the human hand, in a misguided effort to ensure objectivity. Building a machine to chop particleboard with a chisel, for example, may seem more objective than having an experienced woodworker chop dovetails in maple all day, but it's not very useful for telling us about the feedback the chisel gives the hand, about how difficult it is to resharpen, or how well the tool integrates into normal workflow. In a similar vein, tests on linseed oil that use advanced imaging or analysis methods may look impressive, but if the experimenter doesn't have real experience using and processing the oil, and just uses any old oil off the shelf, the test is likely worthless, because not all linseed oils are the same.

Which brings me to one of Spurgeon's most important insights, which is that many basic materials that we take for granted are fundamentally unlike their historical versions. Linseed oil is a great example, but there are many others…turpentine, for example. That noxious substance that you buy at the hardware store is so unlike traditionally made turpentine that it doesn't deserve to be called by the same name.

Spurgeon isn't the only one to discover this: In many ways, his thought parallels Michael Pollan's writing about food in The Omnivore's Dilemma, In Defense Of Food, and elsewhere. And that's not a coincidence. As Pollan shows, the industrial system of production that has developed since the late 19th century has fundamentally transformed our food, from flour and tomatoes, to chickens…and the same is true of linseed oil and turpentine. The food industry and the coatings industry are two sides of the same coin, and both are built, as Pollan might say, on the same, slowly sinking sea of cheap petroleum.

That's a depressing thought, but as Spurgeon dryly notes in Living Craft, we still have opposable thumbs. So, if you want to taste how different a real tomato is from the industrial crap at the supermarket, get a Brandywine plant (or some other heirloom variety) and grow it. And if you want to experience how different good linseed oil is from the crap at the hardware store…well, download Spurgeon's writings below, and get cracking.

Refining_Linseed_Oil.PDF

Living_Craft.PDF


Monday, September 5, 2022

The Search for the Perfect Finish

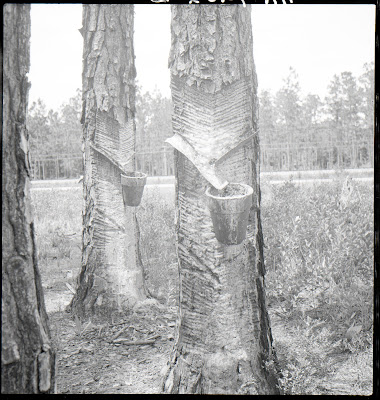
Turpentine trees, Florida, 1936. Courtesy: Library of Congress.

There is no perfect finish, of course. But the search for the right finish for the traditional wooden planes I make has turned out to be far longer than I imagined, and led to places that I never would have expected. Most surprising of all, it's opened the door onto a whole world of pre-industrial craft that I didn't even know existed.

 This month, I have an article coming out in Mortise & Tenon Magazine titled Reconstructing the Varnish Maker's Art: Traditional Finishes for the 21st Century. The article represents one strand of my journey: A deep dive into the history of traditional finishes, especially natural resin varnishes. So in this post, I want to give some background context, and shed some light on how I went from perusing the shelves at my local hardware store to poring through 17th century manuscripts and cooking resins at 600° F on a hotplate in my driveway.

My earliest planes had with simple oil finishes, but when I started making planes for sale, I realized I needed a more durable and protective finish. For a while I used Minwax Antique Oil, because it's popular among planemakers, but I quickly got tired of it. Like so many synthetic finishes, it looks plasticky to me--which makes sense, because the resin component is almost certainly some sort of plastic. And the application process is a pain in the ass. So I moved on, searching for something that would look better, and hopefully be a little less toxic.

For a while, I used polymerized tung oil, and that was okay. But you really need to sand between coats--tung oil never leaves a completely smooth surface. The resulting surface is matte, and I like matte, but this was a bit too matte even for me. So I felt like I needed to wax after buffing the last coat, and that was a pain in the ass too. Plus, you need to keep waxing or the matte surface returns, and over the long haul the tung oil seems to get more opaque.

One other thing I didn't like about tung oil was the way it feels, and that was a problem with the next finish I tried: Osmo. I was talking to Don Williams (renowned finishing expert and former Smithsonian conservator) about this, and he brought up the term "mouth feel," which is apparently used in the food industry a lot. I understood his point right away. I guess we could call it "hand feel," but whatever it is, I didn't like the way Osmo and other hard wax finishes felt. And while it's durable, it's not as durable as some of the other finishes I had tried.

The last commercial finish I used was Birchwood Casey Tru-Oil, and I used it for quite a while. It's a lot like polymerized tung oil, but because it's mostly linseed oil, it doesn't leave that rough surface. It's easy to apply, durable, and looks good, though the look was never quite what I was looking for. And it can dry a little too fast--using it on a hot summer day can lead to a lot of extra work, buffing and reapplying. But still, it was the best commercial product I could find, and I finished a lot of planes with it.


 Meanwhile there was a memory, more than 20 years old, that kept nagging at me. When I first started woodworking, I read a Fine Woodworking article about varnish. It said there were three main types of resin in varnish: Phenolic, alkyd, and polyurethane. I didn't know much about these substances, but I figured they were synthetic, and I wondered how people made varnish before they were invented. I finally started to get a hint of an answer when I happened on an article by the aforementioned Don Williams that pointed me in the right direction. Another phone call to Don followed, and pretty soon, I was doing crazy shit, like washing linseed oil…


and cooking things like Congo Copal resin…


to make real varnish that comes from plants and trees.


Many batches of varnish followed, and I had test samples strewn all over my shop. It's one thing to make varnish; it's another thing to make varnish that you'd rather use than any commercial product. You have to have a high tolerance for failure.Eventually though, I got to a place I was pretty happy with.

Here's a view of a test sample: Tru-Oil in the foreground, Copal varnish in the back. 


Here's another view, this time with Copal in the foreground.


The Copal is a bit darker, though the difference appears much smaller when viewed straight on. It's a lovely color, but what's more remarkable is the difference in reflectivity. With two thin coats of Copal varnish, the wood doesn't really look like it has a film on it; instead, it appears that the shine is coming from the wood itself. Which is what I was after all along.

Anyway, there is more in the Mortise & Tenon article, so have a look if you're so inclined. Yes, it costs money, but it's well worth it--there are many other terrific articles, and Josh and Mike do a great job with the visuals.

I'll have some more posts on the subject this month, including recipes and an interview with the guy who knows more about this stuff than anyone alive.


Saturday, August 27, 2022

New Planes on the Horizon…

 When I started Voigt Planes seven years ago (wow, it does not seem that long), I thought I'd be rapidly adding all sorts of new models, but it hasn't turned out that way. Aside from rabbet and dado planes, I've mostly stuck to my basic lineup of bench planes. But this summer I've been working on a couple new models that I feel very good about, and they should be rolling out pretty soon.

First is a panel raising plane. I'm calling this my "Yankee Panel Raiser,"because it's based on planes by the second and third generations of "Yankee" planemakers, who worked in rural New England towards the end of the 18th century.


Excuse the bags of fiberglass insulation in the background--I'm insulating the shop.


The plane is very basic for a panel raiser--there's no nicker, and no separate flat area for the tongue. There are other panel raisers out there with all the bells and whistles, so I wanted to make a simple, robust design that's historically accurate.


The offset handle is quite comfortable.


The other new plane I've been working on is a slide arm fillister. I've made a couple prototypes of side escapement fillisters (the kind with a fence that screws to the bottom), and they worked fine, but they weren't something I was excited about producing. This one's different. It's essentially a skew rabbet plane with a fence that's secured with wooden thumbscrews. This style was quite popular in the U.S. in the late 18th/early 19th centuries, despite the fact that it was about twice the price of the simpler side escapement fillister.

One advantage of this style is that it's faster and easier to adjust the fence.


The other thing is that side escapement fillisters can be a bit finicky in terms of how they eject the shavings. That's because the skew actually forces the shaving in the wrong direction, so the shaving has to turn in order to exit the escapement, which can lead to clogging. You can reverse the skew--and some makers do that--but then the plane will have a tendency to be pushed away from the cut. With the skew rabbet escapement, however, the shavings eject very efficiently.


Here's a closeup of the escapement:


I hope to have these planes up on my website this Fall. In the meantime, if you have any questions about either of them, drop me a line.

Coming up in the next few posts, I'll be exploring the rabbit hole of historic natural varnishes that I've fallen into the last couple years. Stay tuned!


Saturday, February 6, 2021

Ruminations on Social Media in Woodworking


My first Instagram post, from 2015

 If you read my blog, chances are you saw Mortise and Tenon's recent post "Keep it Real," in which they announced their intention to abandon social media (Instagram, Facebook, Twitter). The post generated a lot of conversation, especially on…wait for it…social media. I found it thought provoking, and much of it rang true, especially this paragraph:

I eventually got myself down to 15 minutes per day of social media usage: enough for one post and a few responses. It felt so good. I was regaining my life back. In the meantime, however, I noticed Facebook and Instagram moving toward greater and greater control of their users' experiences. It’s no secret that these companies design their platforms to be as addictive as possible. Even many stable and well-balanced people, who are otherwise quite resilient individuals, find themselves sucked into the social media vortex. The hasty skimming and instantaneous reactions that these platforms foster leave no room for reflection within the apps themselves. If you don’t respond instantly, the post will fade away into your feed, likely never to be seen again. Despite the fact that, as of this writing, it is still possible to manually search for that inspiring photo on the author’s page, how often do we do this? In reality, 99 percent of the time we experience the app as it was designed to be experienced: as endless scrolling, feeding emotion-driven gut reactions.

I've never belonged to Facebook or Twitter, but for five years I've regularly posted on Instagram. When I started, it felt like there was a real community of hand-tool oriented woodworkers. I had lively debates with fellow toolmakers; I made some real-life friends, and customers found me. Most importantly, I had total control over the content I wanted to see. Back then, Instagram's feed was chronological, there were no ads, and no "suggested" posts (unless you went looking for them). 

But since Facebook bought Instagram, they've methodically transformed it into what my wife calls "Facebook in pictures." An algorithm determines the order of the posts I see, ads are everywhere, "suggested" posts are forced on me, and finding older posts to view again has gotten to be more and more of a chore. It's simply not much fun any more, and I regularly feel manipulated--which makes sense, because that's really the goal of the platform now.

At the same time, there's some irony here. My business has certainly benefited from Instagram exposure, and Mortise and Tenon Magazine probably wouldn't even exist in its current form without social media: Joshua Klein, I would argue, built that publication largely on the strength of his social media presence.

So, I'm not quite ready to walk away from Instagram completely, but it's time to recognize that things have changed. The idea of an Instagram-driven community of hand-tool lovers was always a bit of an illusion--the people preaching the loudest about community were always focused on building their careers as "influencers"--but now the illusion, for me at least, has been completely stripped away. I'll continue to post occasionally, but I'm going to gradually disengage and minimize the amount of time I waste there.

At the same time, I plan to re-center this blog as the primary way I communicate with the woodworking community. For the new year, I've updated my blog roll, I've added an RSS feed gadget in the top right corner (so you can add me to an aggregator like Feedly if you want), and most importantly, I'm posting more often.

Blogs seem pretty old fashioned these days, and they can't compete with the real-time, frenetic pace of social media. But they offer some clear advantages. Ideas can be explored in more detail, and blog entries are easy to find again, unlike social media posts. There are no ads (at least on my blog, and most that I follow). There is no additional content that is forced upon you. For all these reasons, I wouldn't be surprised to see blogs flourish again, as more people are turned off by the ever-more oppressive manipulation of social media. 

What are your thoughts? Feel free to chime in below.


Saturday, January 23, 2021

…what I'm up to so far in 2021


The new Bridgeport


2020 ended on kind of a down note--my octogenarian mom took a spill, and I ended up taking about 8 weeks off to travel back to the midwest to help her recover, and ultimately bring her back to PA to stay with us for a while. The pandemic made all of this much tougher, but I won't complain because so many people are hurting so much worse. I'm in good health and no one close to me is dead or dying of Covid, so I feel very lucky.

In any case, these travails doubled my current lead time for planes, to about 6-7 months, so that's something to keep in mind if you're planning on ordering. So far, all my customers have been incredibly understanding and nice about this--yet another thing to be grateful for.

2021, on the other hand, started with a bang! I've been looking for a mill for a couple years, and I finally got one in the first week of January. Everything just fell into place very quickly.

The mill (pictured above) is a mid 1960s Bridgeport J-head. Most unusually, it has a single phase motor, which makes life a lot easier. It also has DRO and came with a vise, full set of collets, and a bunch of accessories. Quite a deal!

Having a mill will allow me to make more of my irons and hardware in-house, and will speed up production of my planes a little bit. It's not a magic bullet--no machine is, for planemaking requires a ton of handwork no matter how you slice it--but it will help me towards my goal of getting more planes (like plows and fillisters) into production. It's also going to be a lot fun for me: I worked my way through grad school in a machine shop, and a Bridgeport J-head was the first mill I ever used…so this is a bit like having an old friend in the shop.

Moving the mill--which weighs about 1900 pounds--was kind of an adventure. I called up some professional machine riggers, and the only quote I got was for over two grand to move the machine 55 miles down the highway. Forget it. I rented a truck from Enterprise and a drop-deck trailer from Sunbelt, and moved it myself. The key was to use a pry bar and shims to gradually raise the mill up on 2 x 4 blocks, then slide pieces of black iron pipe underneath. On a level surface, it's easy to roll the mill on pipe.


The next time  try this, I'll get a come-along--it would have, ahem, come in handy for non-level surfaces. I was able to use a ratcheting strap for the same purpose, but the real thing would have been nice.


Wednesday, January 20, 2021

Some work I did in 2020, and…


The new Voigt Planes shop

It's been a while since I've blogged, so I'd like to take a look back at some of the work I've done over the last year. 

2020 was a tough year, like it was for most people, but I did manage to break some new ground in my planemaking adventures. First and foremost, my wife and I bought a house (first time!), which came with the 900 sf garage pictured above. I've got a lot of plans for this space, so stay tuned!

Early in the year, I added dado planes to my lineup. These are loosely based on some early American examples, and use wooden thumbscrews and a wooden depth stop. I'm extremely happy with this design--it works great, and keeps both the weight and the price down. And the wooden screws are useful in several types of planes; more on that below.


The idea for wooden thumbscrews actually came out of some research I've been doing at Colonial Williamsburg. In 2017,  I began studying their newly acquired, enormous collection of the earliest American planes by Cesar Chelor and John & Francis Nicholson. In 2019, I did a presentation at their annual Working Wood in the 18th Century conference, and this year, I wrote an article for Mortise and Tenon Magazine that focused on Cesar Chelor.


As part of my work for Colonial Williamsburg, I've been making reproductions (or near-reproductions) of Chelor's planes. In 2019, I made a panel raiser and a stick and rabbet plane; in 2020, I finally tackled the Yankee plow plane. I started with a lefty prototype, since I'm left-handed.


Once I was satisfied, I built two right-handed models for the Hay Cabinet Shop at Williamsburg. One of the planes is made from traditional beech (like nearly all of my planes), while the other is made from yellow birch, which was the species preferred by the early American makers (Nicholson, Chelor, etc). 


In the next post, I'll preview some plans for the shop in the coming year. Happy 2021 everybody; hope the year is off to a good start for you! It's got to be better than last year!


Sunday, February 16, 2020

Deriving the Formulas for Sightline and Resultant angles


Warning for adults: This post is primarily about math. If you're a math phobe, hate math, whatever, you should hit the eject button now! For an excellent, math-free approach to the same topic, go here. This warning is only for adults--teenagers can do this stuff easily.

I've been too busy making planes to dabble in chairmaking lately, but it's never far from my mind. Chairmakers and planemakers have a lot in common, and a number of folks--like Caleb James--do both at a very high level.
I first read about sightlines and resultant angles eight years ago, when I checked Drew Langsner's book out of the public library. In use, it's the simplest, most intuitive way to drill chair mortises. The only difficulty is coming up with the numbers. I know of five ways to do it:
So, do you need a sixth approach? Probably not. But I do! I've always used the numbers in Langsner's book, but I hate relying on a table of calculations without understanding where they come from, and why they work. I need to know what's under the hood and how it was made--maybe you're the same. Plus, if the apocalypse comes and sweeps away all my books, I'll still be able to make Windsor chairs in the post-nuclear hellscape.

Edit: If you just want the formulas for sightline and resultant angles, skip to the bottom of the post, where I give the two formulas and walk through a brief example. If you want to understand how the formulas are derived, read on.
 
To derive the formulas, we only need a bit of high school (sophomore year) math. We need to know SOHCAHTOA, and the inverses of the three basic trig functions. If you've forgotten this stuff, brush up with the linked explanations. I'll wait.

Oh, you're back? Great. I'll start with Galbert's method of drawing the rake and splay. Imagine dropping a plumb line from the top of a chair leg down to the floor. You'll form two triangles, one in side view (rake) and one in front view (splay). Now imagine flopping those triangles down on the floor to get a two-dimensional view, and you'll get this:


Since the the height is the same in both views, I've labeled them both with an arbitrary unit of one. As you'll see, this will be key to finding our formulas.
Next, label the rake and splay angles, r for rake and s for splay. Draw the rectangle defined by the rake and splay axes, and add in a diagonal. This is the sightline. You can think of the lower right vertex as the point where the bottom of the chair leg would sit.


Now we're ready to find the lengths of the rake and splay lines in terms of r and s. Using the tangent identity,
and similarly,


Here's what we've got so far.


Now we need a way to find the sightline angle--let's call it l--and to find the length of the sightline in terms of our other measurements.
The sightline angle is easy. Using the tangent identity again,


File this away for later--we'll use it to find our actual sightline angles.
Finding the length of the sightline is a little more complicated. Since it's the hypotenuse of a triangle, we'll need our sine function:

Now do a little algebra to isolate the "sightline" variable, and you'll get

Here's what we've got so far.


The last thing we need is a way to find the resultant angle, which I'll label t°. Let's draw one more triangle, defined by the common height and the sightline.


Using the tangent identity,


And now we've got the two formulas we need. Let's get rid of the confusing letters and use words instead:


and


Now let's look at an example. To find the angles we need to build a chair, we just have to punch the numbers into a calculator, and use the inverse tan (tan -1 ) button. Let's say we want 12° rake and 14° splay. For the sightline,


Now plug .851 into the inverse tan function:


So 40.4° is the sightline angle.

For the resultant angle:


Plug .327 into the inverse tan function:


And 18.1° is the resultant angle. Now, go make some chairs!