Sunday, February 11, 2024

Depth Stops on Wooden Planes

Greetings All,

It's been a while. I just completed a most-expenses-paid, five day stay at my local hospital, so it's a good time for blogging as I ease my way back into the shop. I'm feeling pretty good, but regaining stamina will take a couple weeks.

Just before my illness, I completed a run of dado planes. At about the same time, Richard Arnold, the eminent plane collector/toolmaker/joiner, did a nice series on Instagram about English Dado planes. He discussed the various types of depth stops used across the pond, but there are a couple different ones that show up in North America, including the one that I've adopted as my favorite. To varying degrees, these stops also show up on fillister and plow planes, so they're worth discussing.

The earliest depth stops, ca. 1700-1775, are simply friction fit. You adjust them with a hammer. Here's a screen shot of one of Richard's planes (I don't think he'll mind). This one's made by William Madox, one of my favorite early makers. The wedges are particularly lovely.


 For those not familiar, the depth stop is the thing in the middle, between the main iron and the nicker. It's simple and elegant, but has obvious long-term problems. So the next step (in England, at least), was to secure the wooden stop with a metal screw, similar to today's lag screws. Usually a brass wear plate is inserted to protect the stop. Here's another of Richard's planes.


This type of stop persists into the 20th century. It was often the cheap option, because as we all know, if you tighten and loosen a lag screw enough times, the threads in the hole will just wear out. So, a more durable setup was needed.

By the late 18th century, the mature form of the English depth stop had come into use: An all-metal stop, with the depth adjusted by a screw, controlled by a knob on top. Here's one from my own collection.


There is much to recommend about this technology: It is simple to adjust, and pretty durable. Most of all, it allows for a large bearing surface, something that isn't practical with a wooden stop. However, there are also some drawbacks. All that metal gear is expensive and heavy. The stop is slow to adjust, and tiring on the wrist. And over the very long run, the screw gets corroded  and hard to turn, metal parts bend, and problems ensue. It is common to find old ones from the late 19th-early 20th centuries that are in need of repair.

In North America, we find two interesting stops that just never seemed to be of interest to the English. First is the wedged stop. I can't read the maker's mark on the plane below, but it is definitely a commercially made plane.


To set the depth, you tap the top of the depth stop, then tighten the wedge. Three wedges in one plane! Here's a look at the stop and wedge:


This type of stop works well. It is simple and inexpensive to make, lightweight, and easy to repair or replace if needed. The main drawback is that it's finicky to adjust and can pop loose when you don't want it to.

Finally, we come to my favorite stop, and the one that allowed me start making dado planes for sale: The type secured with a wooden thumbscrew. A number of years ago, I acquired this plane by T.J. McMaster. It is a factory-made plane, probably from the 1820s or thereabouts.


Here's the stop and screw.


This stop is cheaper to make, and lighter, than a metal stop. It is faster to adjust. If the stop itself gets damaged, any competent user can make a new one. And the wooden threads will outlast metal ones by multiples. This one is about 200 years old and works perfectly, and I have examined plow planes at Colonial Williamsburg that have 300 year old threads in perfect working order. 

Once I found the T.J. McMaster plane, I started making dado planes. Mine have a little nicer fit and finish, but in all essentials, they are the same design. Here's one that will be on its way to a customer tomorrow. First, two pics of the plane before finishing, after a test cut:


And two closeups of the stop, after finishing:

When I first started making wooden planes, I was convinced of the superiority of English planes, and when it comes to bench planes (jack, try, and smoother), that's largely still true. But for joinery planes (dado, plow, fillister), I think the reverse is often true. American planemakers, who had a harder time procuring expensive metal hardware, developed ingenious solutions that often work better than their English counterparts. And often, these solutions are more practical for the modern planemaker. 

I've made a couple plows using wooden thumbscrews, and I love them, but the plow is a tough nut crack in terms of selling a plane that anyone could afford. More recently, I've made a slide arm fillister along the same lines, and that shows a lot of promise. The next task, after I get caught up on my order list a little, is to make a fillister available for sale. Stay tuned.


Monday, July 31, 2023

Making Copal Varnish


Note: Last year, I wrote a post that included instructions for making natural resin varnishes. The feedback I got from several people was that these varnishes were somewhat frustrating to make. And I've come to realize that they weren't ideal for furniture varnish, which is what most people are likely to be interested in. So, I decided to remove that information, and try again. I don't like the idea of deleting old posts, but I don't want substandard information floating around on my blog that's likely to cause people frustration…so let's have a do-over.

In the 18th and 19th centuries, oil varnishes were extremely popular, and the most popular type, by far, was Congo copal. "Copal" is a somewhat imprecise term that just refers to tree resin used in varnishes. Some copals come from living trees, but Congo copal is a partially fossilized resin (similar to amber, but amber is much older). When cooked correctly, it makes a varnish that is hard, water resistant, and beautiful. 

I got interested in making natural resin varnishes a few years. I liked the idea of making a finish that was made from plants and trees rather than from petrochemicals, and I like having control over the finish and knowing exactly what's in it. I learned to cook these varnishes, and I wrote an article about them for Mortise & Tenon Magazine. 

Learning to make a Congo copal varnish was difficult, because no one else was doing it; I had to figure it out for myself. I had help from a lot of dusty old books from the 19th century, but they dealt with batches of 100 pounds of resin, cooked over coal fires, so the methods described didn't always translate well. But I got there eventually, and I'd like to make it easier for anyone else who wants to try it. If you're into it, the instructions and videos below should help you out.

There are two things that need to be understood before trying to make varnish. First, it’s dangerous. High temperatures are required, the materials are flammable, and the fumes can be hazardous. Never cook inside, and never cook over an open flame. I recommend setting up an electric hotplate on sawhorses, at a safe distance from the house, the shop, the car, or the cat. Wear long sleeves, gloves, safety glasses, and a mask or respirator. Have a fire extinguisher close by. Above all, think about what could go wrong, and plan accordingly.

Second, remember that cooking varnish is like baking bread: Sticking the loaf in the oven is the easy part. Success or failure is determined by all the preparatory steps like feeding the starter, kneading, and rising the dough. Varnish is similar: Preparing the oil and resin is most of the ballgame; if you do those steps correctly, the rest is a piece of cake. Or bread.

If you're interested in trying this, you'll need some equipment:

  • Two hot plates. I use a 1500 watt hot plate to run the copal (you need some power to get the stuff up to 625-650 F), and a smaller, cheaper hot plate to heat the oil. 
  • Cooking pots. My favorite pots are enameled cast iron--they conduct heat well and clean easily. You don't need Le Creuset; cheap used pots can be found on Ebay for $20-$30. Stainless steel also works well. I used to use very sturdy Corning Visionware pots (also found cheaply on Ebay), but they can eventually break, so I reserve them for light duty tasks now.
  • A thermometer or two. The cheapest solution is a $10 analog candy thermometer. Make sure you get one that goes up to 550° F and has room for the needle to go past that, so you can estimate higher temperatures.  IR thermometers are handy, but they fail completely  when there's a lot of foam or smoke (I talk about this in the video). 


Here's my trusty $10 candy thermometer. Ignore the goofy setup--it's for making ester gum, which is a whole other ball of wax.

Then, you'll need some stuff to cook:

  • Copal resin. I recommend you use Congo Copal from Wood Finishing Enterprises. Get at least a pound and don't cook less than half a pound at a time.
  • Linseed oil. See my earlier post on this subject. You can follow the procedure I describe for washing and heating the oil, or you can use alkali refined oil. If you use the latter, apply the same heating procedure as for the washed oil: If you don't, the varnish will not combine properly.
  • Solvent. I recommend good quality turpentine--don't use the stuff from the hardware store. The best turpentine is from Diamond G, but it's expensive. My friend David Weaver recently tried turpentine from DIY Chemicals and liked it. You can also use mineral spirits, but be careful adding it--it is more likely to throw the resin out of solution  than mineral spirits.
  • Driers. Japan drier from the hardware store will work fine. I recommend 1-2 teaspoons.

In the videos below, I'm using half a pound of resin, half a pound of oil, and a pound of solvent. Oil to resin ratios vary from 1:1, like I'm using here, to 3:1, 4:1, or higher. If you want a glossy varnish that can be built up to a thick coat, use a 1:1 ratio. If you want more of a satin finish and a thin coat, use a 2:1 ratio.

A note on adding the solvents and driers, since that part was skipped in the video. I like to mix the driers into my solvent and add them together. The boiling point of turpentine is 310°F, so don't add the solvent when the varnish much above that--you don't want the turpentine boiling. If does, put the cover on the pot to deprive it of oxygen, so that an exothermic reaction doesn't start.

Ready? Watch the videos below before you try making any varnish. Questions? Leave a comment below. Experiment, have fun, and be safe.


Tuesday, September 20, 2022

Interview with Joe Robson, Part 2

Joe Robson's logo--an alchemical formula for varnish.


In part 1 of my interview with Joe, we discussed general issues of varnish and other finishes. Here, we focus in a more granular way on the three components of traditional varnish: Oil, resin, and solvent.

Oil


SV: Linseed oil, whether raw or boiled, has gotten a bad rap, especially from the finishing gurus who write for magazines like Fine Woodworking and Popular Woodworking. I recall reading some less than flattering reviews of Tried and True.

JR: That's when I stopped buying Fine Woodworking!

SV: Obviously you disagree, and I'll note that for 19th century writers, linseed oil was the most desirable of the natural drying oils. In your opinion, what did the modern gurus get wrong? Are their testing methods flawed? Are they using inappropriate criteria? Or are they perhaps unwitting shills for the petrochemical finishing industry?

JR: Experience has a lot to do with it. A lot of the people who wrote for those magazines–we won't name names–are former engineers for 3M. I think that they tend to believe what's written on the can. So what's boiled linseed oil is boiled linseed oil, what's raw linseed oil is raw linseed oil, neither of which are particularly good products. The same goes for the tung oil products. I think the prejudice comes from being too scientific, and not studied in the historical aspects of the work. And I think that it comes also from not really being good woodworkers. Because we've all been at the stage where putting a coat of oil on it and getting it out the door was the way to make a living. And it still may be true in a lot of cases, but that's not good finishing. And good finishing comes from understanding the materials and how to apply them and using the best materials you can find. And when you're buying things off the shelf, you're generally not getting the best materials you can get your hands on. So linseed oil, since at least the 12th century, has absolutely been the finish of choice. It wasn't like everybody was happy with a poor finish. It works, but it only works if you're using the right materials in the right way. And again, if you're not a passionate woodworker, you're probably not going to go through what it takes to find out what's good and what you like and what your customers like and the criteria that are beyond the science guys.

SV: Does all oil need to be washed for varnish making?

JR: Yes.

SV: Does it matter what type of water is used?

JR: H2O works.

SV: So does one need to use spring water or distilled water?

JR: I don’t think so. Do you know the easiest way to wash oil?

SV: I probably don't!

JR: Take an empty plastic bottle. Pour your oil in it halfway up, fill the other half with water, shake the hell out of it. Put it in the freezer. When the water is frozen and all the crap is in the water, cut the bottle in half. Throw that ice away. Take the oil, do it again. At a certain point you will have water that doesn't have a lot of little things floating in it and it looks clear. There are other ways to do it but that's the goal. In my experimental days, that's what I was doing. Just having washed the oil doesn't make it good for varnish making but it’s a start.

SV: Is washing with salt or sand ever necessary?

JR: I've read the recipes. I've never used them.

SV: Let’s talk about the “break.” In my own experiments, I took cold pressed oil that had been washed several times, and heated it to around 225° C, but I never observed the “flocculent cloud” that is supposed to appear and then dissipate, indicating that the break has been removed.

JR: You know how fast break happens?

SV: I don't.

JR: (claps his hands together)

SV: Okay, so I probably just wasn't paying attention.

JR: Yeah, you just didn't get to know what to look for. The break is just removing protein that's bound to the oil molecules. There's a point in the cook, where you’ll start to get very large bubbles. And they're kind of hazy when they come off. And they come off fast. And they come off all at once. And then the break is done. What temperature that happens at varies significantly, according to how much was done to the oil previously, how well it's washed, where it came from. So there's no textbook on break that I've ever seen. But yeah, the oil has to reach break to make it usable for varnish. And it's fast. I mean, even if you’re watching it, you'll miss it most of the time.

SV: Is it safe to assume that if you heat the oil to 225° C, you've eliminated the break?

JR: My thresholds are 250° to 275°, depending on what the oil is. When I prep oil after it's washed, I know that I've got to hold it at 250° for half an hour to ensure the break. That works for my oil for the kind of varnishes I'm making.

SV: Can you say anything about how the linseed oil in Tried and True is treated?

JR: Yes, it's a cooked oil, but it's also an oxidized oil. So it's a process of both cooking and introducing oxygen, bubbling it at particular temperatures for particular periods of time to make the oil polymerize correctly.

SV: I see. So it’s a blown oil?

JR: It’s a semi-blown oil because it's a balance between how much it's heated and how long it's been oxygenated.

SV: Is it heated and oxidized at the same time?

JR: For part of the process. There’s also some heat without oxidization, and there's some oxidation without heat.

SV: Where did you learn this particular combination of oxidizing and heat treating? Was it in old books?

JR: Some of it was in old books, but I would say 80% of it was experiments. For years I had rows of glass plates all over the shop with XYZ formulas. This one didn't work, throw it away. Basically you throw away everything that doesn't work, until finally one of them works.

SV: This is very interesting to me, because I've been experimenting with blowing oil. I got a mini-aquarium pump and I’m heating the oil to between 130° and 150 ° C and bubbling it at the same time. Can such an oil be used for varnish?

JR: Oh, sure. Absolutely.

SV: So there aren't any negative consequences?

JR: Well, I assume it was washed before it was blown?

SV: Yeah.

JR: Yeah, then you're fine. It’s a good way to vary the viscosity in the varnish; you can maintain the same oil to resin ratio, and change the viscosity of the product by the degree to which you've blown the oil. Raw linseed oil runs around seven pounds to the gallon. if you run it up to about 7.5, it's kind of like maple syrup in thickness. I've brought it up to about eight and a quarter, and it's like dark honey, like clover honey. All of which again, changes both the viscosity and the drying profile of the varnish. Because the more you blow the oil, the faster it'll dry.

SV: Right, that’s the main reason I’ve been experimenting with it, to speed up the drying time. I blew some for about 16 hours, And my impression is that I need to blow it for a lot longer.

JR: You just have to check the weight when it's going in, and then you'll know where you are.

SV: Should the oil be blown first and then heated to break, or vice versa?

JR: Yes, blow it first, then heat it to break.


Resin


SV: Like linseed oil, colophony has gotten a bad rap; nearly all the old texts I’ve read consider it to be an inferior resin. But as you mentioned, it was the resin for the Golden Age violins of Stradivari, which lots of people have devoted their whole lives to duplicating. And obviously, you and many others use colophony and raw pine resin. What account counts for this discrepancy? Is it an inferior resin?

JR: Colophony has a very low melting point and a very low softening point. So for varnish making in the sense of durability, it's not a good resin. You can get good durable varnishes out of it, but they take a lot more work. The industrial standard had to do with durability, not with whether it made a good varnish or not. I think that there was a prejudice because of price. It was cheap and easy to use, right? It didn’t challenge the varnish makers at the time. So varnish makers could make cheap and easy varnish out of it. They could sell it cheap and easy. And they did. So I think it developed a bad reputation because of that. Not because the resin itself was bad, but because they were making cheap and easy varnishes with it.

SV: It also has a reputation for darkening very quickly.

JR: That's not the fault of the resin. It's the fault of the varnish maker.

SV: How so?

JR: Overcooked rosin, overcooked oil, use of iron in the process, just poor skills and poor craft. How much preparation was done on the resin? How much preparation was done on the oil? It's not the fault of the resin. I have samples of varnish that I made 30 years ago that are as clear and crisp as the day they were made.


SV: Can you talk a little bit about how you cook colophony?

JR: Colophony has a certain percentage of water in it. And you have to get rid of the water before you can do anything predictable with it. So the first cook is always to get it up to the boiling point of water and hold it there until all the big bubbles go away. And when the big bubbles go away, the water is gone.

SV: So there are multiple cooks.

JR: Yeah, depending on what I'm doing with the resin. I cook it anywhere from 10 to 500 hours.

SV: So you’re talking about pre-cooking for color.

JR: For color or other properties. Color being a big one in the violin world but yeah, I mean, it's just there's nothing there's nothing fast or, or predictable about the learning curve for making varnish. I cook the raw resin until it gets to a certain point. And then I can pump the heat up or not pump the heat up, depending on what I want to do with the resin. And violin varnishes I always cook in cast iron, because that's the way it was done. And I cook at temperatures that are predictable within the trade of the time. So, the business of scientific analysis of varnish making is interesting, but it really doesn't apply as far as I'm concerned. You know, the fact that somebody makes a varnish that they took the resin to a certain point and held it for a certain number of hours, in certain atmospheric conditions is interesting, but that's not the way it was done. And so, I try to put myself in the mindset of the people who were doing it and say what's possible, what's probable and somewhere between the possible and the probable, you can come up with a methodology, temperature wise, duration wise, and fit into what you know.

SV: I gather there is some controversy amongst violin makers about the appropriate temperature for cooking rosin for color. Can you say a little more about the temperatures you cook at?

JR: My approach to rosin cooking is low and slow. As I mentioned, the first cook is at 100°C to eliminate water. Then I raise the temperature gradually to 150°C and cook there until the desired color shows.

SV: Is liming (adding calcium hydroxide) necessary?

JR: Depends on what you want. You lime resin because the softening point of the colophony or pine resin is too low. And if you lime it, you lower the pH, which raises the hardness and the melting and softening points. If the resin you're using melts on the table when it's in direct sunlight, your varnish is going to melt when it's in direct sunlight. So yeah, I would think for durability purposes, it's absolutely necessary. I have long ago stopped arguing the point to my colleagues, because obviously, there are other opinions, and it's not universally accepted.

SV: You mentioned that you cook colophony for up to 500 hours for color. Do you lime it first, or lime it after cooking for color?

JR: Yes (chuckles). For some reasons you might lime it first, for other reasons you lime it after. If you know your desired outcome, you can adjust your material towards that outcome.

SV: Is there any particular reason you would lime first or line second?

JR: Yeah, it has to do with the textural qualities of the varnish, how much you want the varnish to self level or not self level. Okay, that's not the only factor. I mean, once you've made that decision, you make decisions about the oil, you make decisions about the turpentine. But that is one factor in that process.

SV: Still on the subject of liming, some varnish makers claim that using calcium hydroxide is inferior, and they recommend zinc oxide. Do you agree?

JR: You have differing results with different materials. I like lime because it keeps the varnish closer to the color that you get from the oil and the resin than anything else I've tried. And it was the tradition. I'm not trying to reinvent something; I'm trying to reproduce something. So all of those things, all of the alternatives work. Doesn't make them bad or good, it's what you want.

SV: In the 18th century, there was a gradual move away from ancient resins such as pine, spruce, and sandarac, and instead copal became the most popular resin. Do you have any thoughts on how and why this shift happened?

JR: Yeah, it made a beautiful varnish. The copals that were coming out of Central Africa in those days were amazing. They were predictable in the cook. The outcomes were controllable. You could make varnish for patent leather shoes, or horse carriages, or hats, or what have you. And people liked them, people paid for them. There was a period of time in the early 1700s that it was like the cocaine of the day. If you had those materials, you were the man. The Vernis Martin is great varnish. It's not particularly difficult to make. But it's probably more mythologized than even the Stradivari varnish.

SV: So you’re a big fan of copal.

JR: For durability, and beauty, there's nothing better. When the copals came into the varnish making world, they were so well received by varnish makers, because they didn't have to cook amber anymore. They could get similar results, not the same, but they could get good results with copal and with a lot less fuss than cooking amber.

SV: You brought up something interesting when you mentioned hats and other things. I think most people think of varnish as something that you put on wood. But in the 18th and 19th centuries, varnish was used on everything.

JR: Yes it was, because it introduced durability to a lot of common objects that were not durable before then, and people loved it. The better you were at making that durability factor, the more successful you were as a varnish maker.

SV: Sandarac is one of the most ancient resins, and recipes are given in a number of old manuscripts. Is a pure Sandarac oil varnish desirable for any application or should it always be blended with other resins?

JR: As long as there's sufficient oil in the varnish, it's good. Sandarac tends to be a bit chippy. So maybe you add a little more oil to that varnish than you would some other varnish.

SV: So greater than a 1:1 oil to resin ratio.

JR: Yes. Koen Padding made violin varnishes for a number of years and his basic varnish was always sandarac. And he was very good at it; he made it very clear. It wasn't a color product at all. It was a very nicely made varnish. But he knew Sandarac; I mean, he had his tricks.

SV: Livache gives a recipe for “furniture varnish” that combines colophony, sandarac, and mastic, but he doesn't give any proportions at all. The version I made was five  parts limed rosin, four parts sandarac, and one part mastic. And I was pretty happy with it, but I don't have a lot to compare it to. Can you suggest any proportions?

JR: What I made was, if I remember correctly,  three parts rosin, 2 parts sandarac, and one half of one part mastic. And the mastic wasn't cooked in. Mastic was added at the end, just as a plasticizer. It's a balancer for the Sandarac, to add a little bit more elasticity to the resin. But that was a very transitional varnish for me. I was learning to make the old varnishes. And that was like a first successful step into the old varnish.

SV: I’ve read that sandarac can be difficult to run, but I found it to be pretty easy to work with.

JR: Well, if you're not cooking sandarac for color, then you can get it to run and obviously you can cook colophony quite easily. So it's a great way to get your feet wet.

SV: When you cook sandarac, what kind of weight loss are we talking about?

JR: I'm cooking to somewhere between 75 and 90% weight loss. Depending on the batch of resin, it usually runs around 80%. It's a beautiful red.

SV: That’s a lot of weight loss–you’re ending up with only a quarter of the resin you started with!

JR: Well, sandarac doesn't reach true oil solubility until you hit that 75 or 80% weight loss. Otherwise you will have stuff in the varnish that does not combine with the oil. And in terms of transparency, that can be a problem. Sometimes that material will filter out and sell to the bottom, but sometimes it'll just remain suspended.

SV: Do you run the sandarac in more than one cook?

JR: Three cooks.

SV: Why three?

JR: That's what works.

SV: How do you decide when to turn it off, cool it, and then cook it again?

JR: I think the resin will tell you when it's done.

SV: How does it tell you?

JR: It won't change any more in the pot. You cook it, you cool it, it looks like this. Okay. Then you put it back in the pot and you cook it and cool it, and it looks like that. And finally you cook it and cool it and it looks like what you want it to look like. But if you go through that whole process, and try to do it all at once, you'll never get to what you want.

SV: Can you say anything about temperature?

JR: Hot, but not amber hot. Copal hot. At lower temperatures in your initial cook, you will see a lot more stuff coming off. You have to raise the temperature higher in the second cook. You're gonna raise the temperature again until you get stuff coming off. And if it's coming off too fast, you're gonna burn it. On the third cook you're not going to see much coming off.

SV: Any thoughts on using amber?

JR: Nothing compares with Amber. It's the standard. It takes a much higher temperature though. Much higher, and there’s a longer learning curve. Once you get it, it's simple like everything else. But it is a long learning curve. And you don't cook amber in small quantities, because you'll burn it.

SV: What does pill, or string length, tell us? You've mentioned that pill can vary from a little bit of stickiness to long strings. How do these differences translate into qualities in the finished varnish? (Note: this question refers to putting a drop of hot oil/resin on a hard surface, letting it cool a bit, then dipping a finger into the mix and pulling it away. If the mixture produces fine filaments, or “strings,” it indicates the resin and oil have properly combined.)

JR: The hardness of the film is a factor, and the application technique is a factor. The shorter the pill, The harder the varnish, and the longer the open time. That's very important in violin varnishing, because you're dealing with this weird surface that has holes in it. If you're varnishing a coffee table, it might not be so important to you. So you might want to cook to a longer pill because it will be a more durable varnish. Given the same preparation of the resin and oil, the durability will go up and the open time will go down.

SV: Is maximum string length correlated to the oil resin ratio?

JR: It's not.

SV: So can a two to one (oil to resin) varnish produce long strings?

JR: Yes.

SV: If a batch isn't producing strings, what are some of the possible reasons?

JR: Probably the oil was not processed correctly, or it wasn't ready to accept the resin or you didn't reach the temperature threshold necessary for that particular resin. If you're using a very raw oil and a very raw resin, they're going to take a long time to get together and produce a pill. If you're using a highly processed resin and a highly processed oil, they are going to take a very short time to come together. It can also be the surface you drop the pill on. Get a piece of marble or Corian.

SV: When making varnish, do you always preheat the oil separately and then add it slowly into the liquefied resin?

JR: Yes and no. Some varnishes want to be cooked together, some varnishes don't want to be cooked together. The varnishes I make are almost always cooked together. Process the materials and heat them up.


Solvent

Note: it's not mentioned below, but Joe is adamant that Diamond G turpentine is the only brand worth using. See my article in Mortise and Tenon Magazine for more info.
 

SV: Let’s talk about solvents. Turpentine is the traditional solvent–

JR: The only solvent.

SV: The only solvent?

JR: For varnish it’s the only solvent.

SV: Well okay! So, what's your opinion on when varnish makers started to use turpentine?

JR: The earliest records we have are from the 12th century. But the use of turpentine and the presence of turpentine goes back to the medicinal records of Pliny the Elder. So much older. If you have a varnish that dried to a film, it had turpentine cooked into it. If you make a varnish that didn’t dry to a film, it didn't have turpentine cooked into it.

SV: But I've looked at some of these Renaissance manuscripts and they don't mention turpentine. It's usually just oil and resin.

JR: I think that much has been lost in translation. If you look at the varnishes from those times, they have the qualities of a material that's been made in a certain way, so they exist in a certain way. If you have qualities that are made in another way, they will exist in that way. The materials haven't changed. The way they want to be cooked  together hasn't changed. So, if you have a film from the 12th century, 99 times out of 100, it'll have turpentine cooked into it. If you have a film that doesn't build to a surface, to a polishable surface, it's likely it didn't have turpentine cooked into it.

SV: So you're saying that turpentine is necessary to create a film forming varnish? Why?

JR: Because it's the difference between a mixture and a compound. Oil and resin cooked together make a beautiful mixture, and it will give you a certain type of surface. Can you build a film out of it? If you can, will it have the same characteristics as the film of the same materials with turpentine cooked in? No, it won't. And the catalytic properties of turpentine cooked into the varnish, make it a compound. That’s just that's the way it is; A plus B equals C, A plus B plus C equals something else equals varnish. And we can call it whatever we want. But without turpentine, it doesn't go through the chemical changes.

SV: You've written that “the addition (very carefully!) of turpentine during the varnish cook does more than just dropping the viscosity; the reaction of turpentine with the oil and resin promotes a mutual solubility that cannot happen without the turpentine. You've already said a fair amount about this; anything else to add?

JR: In the violin world there's this subculture of solvent-free varnishes. Where that comes from I don't really know. Violin makers can take a detail and make a religion out of it faster than any other group I've ever encountered. And that's one of those things.
Some say the old varnishes were solvent free. Show me the way the varnish on the old instruments looked, the way it wore, the way it looks on those few instruments that have not been beat up and refinished by shops. I see varnish: resin, oil and turpentine. Oil and resin and turpentine make varnish; oil and resin together don't–they make oil and resin. And excuse me for being a purist. But I studied this for a long time. And it's not my opinion, it's the opinion of decades, centuries of varnish makers. Just because they didn't put it in the recipe, well, they don't tell you to wash your hands when you're done either.
But the proof is always in the observation. The materials have been here forever. And the materials haven't changed a bit, but our ability to manipulate them may have changed a great deal, because we have forgotten the lessons of the past. So I just think it's people believing a story and repeating it until it becomes the truth.

SV: I get the sense that how you cook with turpentine is a pretty closely guarded part of your methodology.

JR: Yes, for three reasons. One, it's dangerous. And two, it's dangerous. Three is that the amount of variability is huge. So, yes, I believe turpentine has to be part of the process. If I told you what I do, and when I do it, you would probably get hurt. And I have been hurt. So I know where the dangers lie. The other thing is that the amount of turpentine, and the temperatures used, vary the quality of the varnish tremendously.

SV: Yeah, I understand. I'm chuckling here because the question I wrote down was, can you suggest some guidelines that will allow me to experiment without blowing myself up? Specifically, do you cook the turpentine above the boiling point of 310°F/160°C?

JR: A little higher, a little lower, depending on what I'm looking for. But right in that neighborhood, right in the danger zone.

SV: I assume you turn the heat off before you add the turpentine?

JR: I take it off the heat.


Final Thoughts


SV: Like you, I work in a craft (planemaking) that nearly disappeared in the 20th century, and I spent a lot of time trying to figure out old methods that were lost to history. So I can relate to varnish making and what you do. It seems to me that we're in the midst of a resurgence of interest in hand tools, and more generally pre-industrial crafts and ways of working and living. Do you agree? Are you optimistic about these things? Do you see a resurgence of interest in real varnish made from trees and plants?

JR: Certainly, in the violin world it’s huge. I don't think the information has really filtered out much beyond the violin world. Primarily because most woodworkers are just working wood, and finishing is really an afterthought for unless you're a finisher. I think the one of the keys to this is that I'm seeing a lot more use of shellac. And I think as people understand shellac, they will begin to understand that there are organic alternatives. And once you get past that, and you begin to understand what you can do with a good finish, then your interest is piqued.

SV: Is there ever going to be a Joe Robson finishing or varnish making book?

JR: I’ve thought about it, been encouraged and discouraged. I would probably sell three copies and then they'd be photocopied on the internet.

SV: You'd sell a lot more than three copies!

JR: Well, yeah. My brother is a historian with connections in the publishing world. So that path is done. Whether I ever actually get around to doing it or not, I have no idea. But my notes, my observations are written down, and there are people who know where it is. So the craft of it won't be lost whether I put it together or not. I've come too far to think that I should just die with this information.

SV: Joe, thanks so much for talking varnish with me, and being so generous with your time.


Interview with Joe Robson, Part 1

Photo courtesy of Tried and True Wood Finishes.


 Joe Robson might know more about traditional finishes--especially natural resin varnishes--than anyone alive. He started cooking up his own finishes for his cabinetmaking business in the 1980s, then went on to found Tried and True, which (as far as I know ) was the first VOC-free natural finish manufacture in North America, and is still going strong today. After 20 years, he sold the business to focus on his real passion: Making violin varnish. Today, these varnishes are highly sought after by violin makers. 

This summer, I drove up to Joe's workshop in Trumansburg, NY to interview him. Part 1 of our interview is general in nature, while part 2 will delve into the specifics of oil, resin and solvent--the three main ingredients of traditional varnish.

This interview has been edited for length and clarity.

Beginnings


Steve Voigt: Joe, thanks so much for agreeing to talk about your work. I read somewhere that you were a philosophy major in college. How did you go from philosophy major to running a cabinet shop?

Joe Robson: It was kind of a two sided coin, as most things are. I went to college and discovered that I had to eat. And although I had a good scholarship, I had to pay for the rest of my life. And I got started, as a lot of people do, painting houses, and that painter’s trade turned into taking carpentry jobs. By the end of college, we had built 28 houses. So I learned to be a carpenter the hard way. And the other half is I was sitting in a philosophy of religion class. And I'd been doing carpentry for a couple of years and reading about the American Shakers, and I'm supposed to be paying attention to the text but instead I'm looking at the furniture and thinking “I could do that.” I mean, I had no skills, none whatsoever that way. I could barely use a hammer and a saw at that point. But it was like a lot of other things; It was a question I couldn't answer until I tried it. And I ended up building a lot.

SV: How long did you work as a cabinet maker, and what kind of cabinet work did you do?

JR: I started the cabinet shop around 1976, I think. It was all, you know, all transitional; I was doing carpentry and somebody needed a kitchen and I said oh, I can build you a kitchen. So I built the kitchen. And then somebody else asked me for a kitchen and I started acquiring tools. And I did a lot of kitchen cabinets, I mean acres of kitchen cabinets. And probably had I been intelligent and resourceful I would have stayed in that business, probably would have retired in that business, but I wanted to be a better and better woodworker all the time. And so I sought out commissions that were beyond my kitchen cabinet work and had some failures and had some successes, and thought I should be God's gift to woodworking and that was wonderful. But it was a very difficult way to make a living in Trumansburg New York and raise children and be a dad and all those things.
So I had the cabinet shop into the mid 1990s. Then in 1992 we started Tried and True Finishes. And eventually the tools got pushed into what used to be the lumber shed and Tried and True took over and we did that for 22 years out of the two car garage next to the house.

SV: How did you get started making your own finishes?

JR: Actually we're running up on my 40th anniversary of making varnishes--it was June of 1982.
I was doing a lot of shaker furniture, all that I could get commissioned at that point. And there was a show in Washington at the Corcoran Gallery called Shaker Design. And a number of us (cabinetmakers) who were doing modern work were invited to bring a piece down to Washington, so that people who exited through the Shaker Design show would walk through a room of new work. And one of the perks of having a piece in that show was to go down to the opening, and get to look at all this furniture that I'd only seen in books or in museum settings, crawl around it, look at it, pull the drawers out. I was quite happy with my woodwork, but I knew my finish was not going to look like that 150 or 200 years.

SV: What were you using?

JR: Linseed oil, beeswax, things that were labeled linseed oil. What I realized is that they were those products in name only. And I realized that what I was using was not going to do what those finishes did. And it just kind of created an itch, and I never stopped scratching. So I started experimenting soon after that show, making combinations and trying to cook my own oils. And then about a year into that, one of the guys in the shop bought a book called German and American Varnish Making by Max Bottler. And it was just like, somebody had opened a door. For me, all of the things that I was suspicious about now had names, and processes now had names. And that just gave me the springboard to try and experiment and put these things together. And I started cooking and buying resins and processing oil, much to my financial degradation. But yeah, that was the jumping off point.

SV: Yeah, I can relate to the money pit part of it.

JR: Many times I have told violin makers that I have thrown away more varnish than all the violin varnish that's ever been made or put on an instrument or spilled by at least 10 times. But it’s been an interesting journey, because basically, in the cabinet trade and in the varnish trade, my generation thought we were reinventing the wheel. And it wasn't until I was far more into the trade that I realized the problem was World War Two, that the cabinet makers of my parents generation died in World War Two. And the varnish makers of that generation and the prior generation died and got bought out by the war because from 1933-1936, the petrochemical industry went into the American varnish industry and decimated it, they fired all the cooks like me, they replaced them with inorganic chemists, they replaced the natural materials with petrochemical resins and petrochemical solvents, and the craft part of it died. And those that didn't get fired, died in the war. So there was this huge gap in understanding and it took a while to uncover the information and then to realize that you didn't have to reinvent everything, but you had a lot of learning to do.

SV: You mentioned linseed oil and wax finishes; were you also making varnishes at this time?

JR: Yes, other types of finish to begin with, and then varnish in later years.  

SV: In 1992, you started Tried and True finishes. How did that come about? And what was it like to go from being a cabinet maker to being a finish manufacture?

JR: It came out of all this Shaker research, that I understood that these were linseed oil based finishes. But what I was buying in the can, at the hardware store, did not behave in the way that those finishes did, or last in the way that they did. And the whole market was saturated with products that were giving me headaches and making me sick. And I had to stop using them. And I started processing oils, until I found a group of oils that were actually predictable in drying, predictable in their long term use. And I started giving it away. I mean, guys would come visit the cabinet shop, leave with a mason jar full of this stuff. And you know, I'm not much of a businessman, but it hit me over the head enough times. And I sat down with my wife and I said, I can't do this by myself--do you want to do it together? So we wrote some rules and put it together and we had the first linseed oil-based, totally non-toxic finish company, probably in the world.


SV: Well, I'll just note parenthetically that although you sold the company in 2004, Tried and True finishes is still going strong.

JR: Yes, and I'm glad it's still available. I still occasionally get phone calls from customers!


Violin Varnishes


SV: How did you get started making violin varnishes?

JR: I was selling a jointer, and a local violin maker (Ben Ruth) came in to look at the jointer because he wanted something big enough to flatten cello plates on. And he noticed I was cooking varnish and said “why aren't you making this for us?” I didn't even know who “us” was. So I began making violin varnishes very soon after we started Tried and True. Profit margins were nice, and I liked the people I was working with. But it was just a sideline.

SV: And that was just from word of mouth from the violin maker who came to buy the jointer?

JR: Yes, he introduced me to his world, and it kind of went on from there. And after twenty years of making Tried and True, we were ready to sell. Twenty years is a long, long time to be throwing five gallon pails of oil around!

SV: What are some of the ways in which violin varnish  differs from furniture varnish?

JR: It's mostly a matter of stability and hardness, but that stability and hardness goes back to the way the varnish is made. When Antonio Stradivari, the greatest maker of all time, was working, the modern resins were copals and amber. They were the hit of Europe at the time. In the 1720s, there were two cabinet makers in France, the Martin brothers, and they became varnish makers and cabinet makers to the king. Some of the furniture is still in the palace, as perfect as the day it was made. Stradivari and his predecessors in the Amati family were exposed to those varnishes. They could have gotten on that train and ridden it, but they didn't. They stuck with tradition.
See, violin varnishes are poor quality varnish that relate mostly to what in the 19th century was called chair varnish. In chair manufacturing, they'd have these long tables, and the guy with a chair would stand at one end, and the varnish would spray up at the table. And they would just turn the chair quickly through all of these sprays and set it down to dry at the other end of the table. And these were rosin based varnishes that dried fast. Yes, they were chippy. And yes, they didn't hold up to sweat, but they were pretty, and they got done fast. And that transition between the furniture world and the violin world was something for me to understand. Because what furniture makers saw as a fault, violin makers saw as a feature.

SV: That's an interesting comparison. When you say it’s poor quality varnish, what you mean, if I understand you correctly, is that it's built to wear out.

JR: Built to wear in a particular way, at a particular rate for particular reasons. They all wear in different ways. But violin varnish at its best is a very narrow road. And it doesn't follow the rules of commercial varnish making.

SV: For someone who's not in the violin varnish world, can you describe, in general terms, the multi-step system that you and other people use for varnishing a violin?

JR: Well, we start with the ground. And there are many types of those.

SV: What is the purpose of the ground?

JR: Ground in its least form seals the wood, particularly with spruce, so that the varnish doesn't over absorb and give you an uneven finish. But beyond that, there are properties, particularly of the Cremonese instruments, that are very brilliant. And it has to do with how we control the light that goes into the wood. So beyond the practical there is an artistic factor there about how much sparkle can we get underneath the varnish before we start. I mean, there are optical properties of these great instruments that basically have to be in place prior to varnish to get the right look.
How the old instruments were originally done, nobody knows. And for me, personally, I don't really care. It's interesting. But what I'm looking for is results.  So, the degree or the amount of light that gets into the wood and gets bounced around and comes back is a factor in how the varnish behaves, once the varnish and color are on. So you have to be able to control that prior to varnishing, if these are the effects you're looking for,

SV: How does the ground differ from a varnish in terms of what it's made of, or its properties?

JR: Well, some people use varnish for the ground. Some people will use a protein like egg white, or casein, the stuff that hide glue is made out of. Many proteinaceous materials can be used as a sealer. Some people use shellac, or water glass. I mean, it's an endless, endless discussion.

SV: Is there a difference between a ground and a sealer?

JR: What remains popular with some people in the violin world is what’s called a mineral ground, basically something like Plaster of Paris or a mixture of minerals made up in a paste with varnish that goes on like toothpaste. Not that much different than the way one would seal oak on an oak floor. You know, you put this paste on, you let it dry, you scrape it off, and what's left in the woods seals up the pores.


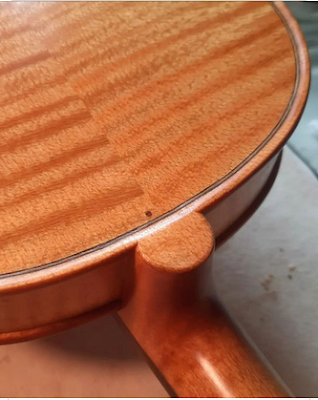
Joe Robson's Ground.


SV: What comes after the ground?

JR: In my own work, I'll generally put down a coat of clear varnish after the ground. Because I think that the light reactions are better, and closer to what I'm looking for, like the old instruments, if there's a clear layer down first. And then we'll apply color, either colored varnish or pigments or whatever you choose to color the varnish. And generally that's two or three, or maybe four applications, again, depending on your style and your experience. And then a coat of clear over that. So the color varnish ends up being sandwiched between two layers of clear.

SV: Let’s talk about the color layers. You’ve written about two ways you make colored varnishes. The first way, which seems to be widely used by violin makers, is to cook resins, primarily colophony but also sandarac, until they lose 75-90% of their weight, which gives the varnish a deep, reddish brown color.
The other way, which you described in the article “Scarlet Fever” (The Strad, September 2018), is to attach a cochineal lake to linseed oil. Can you tell me a little about that? (Note: Cochineal is a red dye derived from an insect. A lake is a dye that has been precipitated onto a substrate such as alum to make it insoluble in water).


JR: My claim to fame, if you can call it that, is that I figured out how to attach a lake to linseed oil without making a particulate. And that is the root of my colored varnishes. It's a process that I figured out, but I didn't invent it. It's been around for centuries, but nobody else does it, at least not in public, not that I know of.

SV: What did you mean when you said “without attaching a particulate”?

JR: I'm making a lake which is truly a lake in all other ways, except that instead of becoming crystalline, it attaches itself to the linseed oil.

SV: So you're not using alum or something like that to precipitate a powder?

JR: I'm using all of the same materials and the same process, but I’m doing it in a way which does not precipitate a crystal; it precipitates the coloring process onto the linseed oil molecule. So it's a transitional process. It's always liquid, and it's always attached to the oil. So you get a very intense color, but a translucent medium with no particulate.

SV: And how does the result differ from other processes, like cooking resins for color?

JR: You get the red color, you just don't get the right optical properties of the varnish. Other approaches, like making rosinates, make beautiful varnishes, but they don't do the things that the Stradivari varnish does optically.

SV: I think in the article you described these other approaches as monochromatic.

JR: Yeah, monochromatic, more metallic in their color. The varnish takes on the optical properties of the resin, so there's a metallic sheen to it. When you attach the lake to the oil, you get that softer, multifaceted reflection that you get from oil.

SV: Reconstructing Stradivari’s varnish, as you believe you’ve done here, seems like a monumental achievement. How long did it take you?

JR: It was years of failure, Steve. I'm trying to remember how many years at the moment, but it was a long time ago. I understood how to do this when I reached the point in the Stradivari research where I finally had usable materials to work with, in terms of scientific and historical information. And from that point forward, it was still seven years between having the information and having a varnish that I would be willing to put up in public.

SV: That’s an amazing amount of persistence. Are you no longer cooking resins for color, now that you have this other process?

JR: Oh, no, I'm doing it all.

SV: So why would someone choose to buy your colored resin varnish, versus buying the cochineal varnish?

JR: Well to start, there's a big price difference. But the other factor is that violin makers have their own ideas. And I'm a tool guy, and I've been providing tools to violin makers for over 20 years. So when somebody develops a method, they want to come back to me and be able to buy the jars that they bought last time, and have it all work. There are a lot of people who aren't particularly interested in the historical correctness of their varnish–they do things their own way artistically or for whatever reason. And then there are people who follow that crazy little narrow road to Cremona, and those are the people who will latch on to the cochineal varnish and stay there.


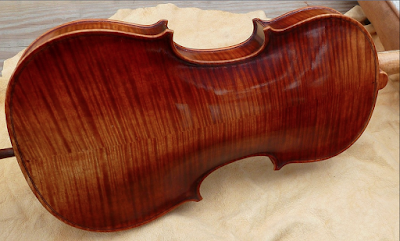
Joe's cochineal varnish.

General Varnish Making


SV: Today, the dominance of synthetic varnishes is such that most woodworkers will go their whole lives without ever using a traditional oil resin varnish. What are they missing? What qualities do traditional varnishes have that are absent from synthetic varnishes?

JR: Synthetic varnishes are basically plastics dissolved in solvent. They're not cooked resin. So the optics are completely different. The clarity, the depth of reflection, the ability for a varnish to pull varied colors out of the wood, is completely lost. Synthetic varnishes are basically made like paint–their effectiveness is based on opacity rather than clarity. So the image that always comes to my mind is taking an old piece of Plexiglas from your storm door, and running it through a grater and taking that stuff and dissolving it in mineral spirits. And then maybe you dump a little bit of raw oil into it, it's probably raw tung oil, which doesn't really like to be there with the mineral spirits, but it gets in anyway. And you mix it up, and you put it in a can and you call it varnish. I mean, this is what happened to the industry in the 1930s. This is when cooking varnishes went away and inorganic chemists took over the game. And it was basically to supply World War Two with cheap varnish.

I think that it's a true tragedy in our trade as woodworkers, because the experience of actual finishing is a tremendous addition to the art that we do. This bench (motions to the beautiful old workbench we’re sitting at) came out of my wife's great grandfather's house. That house was finished in 1907. The varnish in the house was two coats of shellac, and three coats of copal varnish. And the day they sold the house the finish looked as good as the day they put it on. So the durability factor is huge. But look, I'm in this for the optics, and what you draw out of your work with a real oil varnish can't be done with plexiglass and mineral spirits.

I'm working with a guy out in Ohio who is a great mandolin maker and he's restoring a 1920 Lloyd Loar mandolin. And he called me and said, “this is what it looks like, tell me what they did.” Well, somebody sprayed this thing with one of those early pre catalyzed lacquers. And they get milky, and they have no adhesion. And that's a big difference between modern and old varnishes, the adhesion factor, and he was able to pull that new laquer off with a razor blade and just scraping. And under it was the copal varnish that they used on the older instruments. This is damn tough stuff. And we still polished it after that. I mean, I could keep going on about this subject, because I just think it's a sorry thing that the woodworkers of today don't have access to these varnishes.

SV: Do you cook the varnish in cast iron?

JR: I cook the resins in cast iron, and I cook the varnish in stainless steel, but the cooking of the varnish is such a tiny part of the procedure. I mean, at best you're talking 20 minutes.

SV: Really?

JR: Yeah. My theory behind all of this is the faster you bring the resin and oil together and have the varnish made, the more clarity you get out of varnish, the more translucency you have. The longer you cook, the less translucent the varnish becomes, and it may have other qualities which you may or may not like. But if you're cooking for clarity, bring your materials to the point where they want to be together as fast as possible, and be done with it. The preparation is key; there's far more time and effort put into the preparation of the materials than the actual varnish making, the actual varnish making is almost an afterthought.

SV: Wow. That's not how I was thinking about it. That's quite a revelation.

SV: Is a thermometer necessary?

JR: I think it's necessary to learn. One big factor is if you have pine resin or colophony that was harvested in North America, it has abietic acid in it. And for linseed oil and abietic acid to combine properly, they have to hit a minimum of 150° C. See the old trick about putting a goose feather in it, goose feathers melt at 150° C. So you need to learn where those thresholds are. The only time I use a thermometer now is when I'm preparing my oil. Because I want to see exactly where the temperature thresholds are. And I'm preparing it in fairly large batches, probably three gallons at a time. But for preparing resins, I don't use it at all anymore. Because again, every batch is slightly different. So I operate more by smell and sight. As the resins cook, they will change. The odor will change and the color of whatever's coming off as smoke or moisture will change and those are far better controls than temperature, because again, materials may start off in a slightly different place. So when the smell changes, you know what to do. When the smoke changes, you know what to do.

SV: Learning to make varnish can be daunting. What qualities enable one to have some success at it?

JR: Observation, the willingness to fail, and a certain amount of curiosity are all important. I would say the ability to observe accurately without prejudice is probably most important.

SV: Without prejudice. That's a good phrase.

JR: Yeah, you know we all have preconceptions we bring to the process. The fewer of those you have, the more likely you are to succeed.


Sunday, September 18, 2022

Refining Linseed Oil


Linseed oil in mid-wash. The stuff in the middle is mucilage, and you don't really want it in your oil.


Note: This post originally had a section on making varnish. I decided to pull the information because I felt that it was leading people in the wrong direction, and the varnishes I recommended weren't ideal. If you're interested in making your own varnish, please see my post "Making Copal varnish."

To make varnish, you need good oil. The procedure below describes how I prepare oil for varnish making. But this oil doesn't have to be used only for varnish--you can use it as a standalone finish, or combine it with wax for a "soft wax" finish. It will dry roughly twice as fast as raw oil, and will be significantly less yellowing over the long term.

 Refining Oil

The following is a pretty simple method of washing oil. It takes a relatively long time, but requires very little effort. For a comprehensive look at oil washing, see Tad Spurgeon’s book Living Craft, available as a download in the previous post.

 Stuff you’ll need:

  • Cold pressed linseed oil. Avoid most oil sold as flax oil in health food stores, and avoid all bargain basement oils available online. The Swedish cold pressed oils (Ottosson, Allbäck) are very good. I especially like Ottosson, but it has to be raw; do not use boiled linseed oil. 
  • Water. Tap water is usually fine for this method, especially if it’s relatively soft, but if it’s hard it may be too aggressive. If you have difficulty getting the oil and mucilage layers to separate, try spring or distilled water.
  • Canning or kosher salt. Look at the label and make sure it’s just salt, with no extra ingredients like anti-caking additives. Diamond Crystal brand is good and cheap.
  • Screw top jars (Ball jars work great) and a bulb baster.

Washing: Fill a jar three-quarters full with two parts water, one part oil, and a cup of salt for every 16 ounces of oil. Screw the lid on tight and shake vigorously for one to two minutes, then let the jar sit undisturbed, on a sunny windowsill if possible. Perform the shaking procedure three times per day.

After the first shaking, the oil and water will separate within a few minutes. But after several rounds of shaking, a mucilage layer will form in the middle. With more rounds of shaking, the mixture will separate more slowly, and the mucilage layer will grow larger. This may take a few days, or it may take a week: It depends on the oil and the water. If you reach a point where the mucilage takes a long time to separate, change the water. If not, change the water after a week.

To change the water, use a bulb baster to transfer most of the oil to a clean jar. To remove the last couple ounces (you can’t do it with the baster), gently pour water into the jar until it’s completely full. Wait a few minutes for the remaining oil to separate,, then use a spoon to remove as much of the remaining oil as you can. Try to avoid picking up mucilage, but don’t worry if you get a little–you don’t need to be really careful until the final wash.

An alternative method of removing the oil is to simply freeze the jar, then pour off the oil. There are pros and cons to each method: Freezing takes longer and not all the mucilage may freeze, but it’s much less fuss. Jars may crack after repeated freezing cycles, so you need to inspect them carefully.

After you’ve removed the oil, repeat the whole process. The second wash may require fewer rounds of shaking to reach the point when the water needs to be changed. Then do a third and fourth wash, but do not use salt for these last two washes. After the final wash, transfer the oil to a clean jar, being careful to avoid picking up any mucilage. About a third of the oil will be lost during the washing process.

Optional Pre-wash: Before the first wash, you can do a pre-wash with water and vinegar. The vinegar helps the mucilage separate more easily in subsequent washes. To 16 ounces of oil, add 3 ounces water and 1 ounce apple cider vinegar. Shake together for two minutes, allow a few hours or overnight to separate, then remove the oil. 

Safety note: Always dispose of rags soaked with linseed oil safely--there is a small but real chance they could catch fire as they dry. I like to spread them out, weighted down with pebbles, until they dry thoroughly.

Troubleshooting: If the mucilage is separating very slowly, try gently spinning the jar for about thirty seconds. Repeat every few hours. A stubborn emulsion can sometimes take several days to fully separate. If it’s not separating at all, put the jar in the freezer overnight (make sure it’s not completely full, and don’t screw the lid on too tight). Take it out the next day and let it thaw completely; this will break the emulsion. After the emulsion breaks, change the water; if you’ve been using tap water, try distilled or spring water instead.

Clearing: After the last wash the oil is clean, but still turbid due to residual water. The safest and easiest way to clear the oil is to cover the jar with cheesecloth, and let it sit in front of a sunny window for a few days. When the oil is completely transparent, it is ready to use–just decant it to another container, leaving any residual water behind. 

You can also clear the oil with low heat, but be aware that this is potentially quite dangerous. You must heat the oil slowly to the temperature of boiling water (212°F/100°C); do not exceed this temperature by more than a few degrees. If you heat the oil too fast or too hot, the boiling water, trapped on the bottom, may erupt in jets, causing serious burns. You will need to monitor the temperature carefully, and if there is much water, it can take a long time to evaporate. Even when done correctly, this method is messy–the water makes the oil spatter, covering everything within a few feet with a fine, greasy spray. I much prefer the first method.

When the oil is cleared, you will have a raw, refined oil that greatly exceeds in quality anything you can buy. It can be used anywhere you’d normally use raw linseed oil, but it will dry considerably faster. However, there is still one more step before we can use it to make varnish.

Breaking: This step eliminates impurities that cannot be washed out, and can coagulate when the resin and oil are combined.

Stuff you’ll need: 

  • Electric hot plate. For this step, almost any cheap hot plate will work. 
  • Thermometer. Infrared thermometers are cheap, can read very hot temperatures, and don’t require immersion, which comes in handy when melting resins. Immersion thermometers are more accurate, but good ones are expensive and can’t read the high temperatures needed for some resins. Get both if you can afford it; if not, get an infrared.
  • Stirring rod (glass or stainless steel is best). 
  • Saucepan. For oil, and for rosin varnishes, a cheap, stainless steel 1 quart pan will work well. 

Heat the oil (remember, outside, on an electric hotplate) to 450°- 475°F (230° - 250°C), and hold for thirty minutes. If you did not use heat to clear the oil, watch carefully as the temperature reaches 212°F/100°C, and if you see bubbles, hold the temperature until the bubbles disappear. Monitor the temperature carefully; if you go much above 500°F, linseed oil starts to break down, so avoid getting it too hot. You may actually see the “break,” which will appear as an opaque cloud that suddenly dissipates; but you may not–it happens pretty quickly. Safety note: Don't walk away while the oil is heating. The temperature can climb pretty quickly, and if it climbs high enough, the whole thing could catch fire.  

After heating, the oil will dry faster, and it will also appear much darker than before. However, if you put a drop on a piece of glass and spread it out, it will be completely clear. If you apply it to wood, it will look no darker than before it was heated. The color of oil is fugitive; how it looks in a jar has almost no relationship to the color of a thin film.

Congratulations; you're ready to make varnish with this oil, or use it however you like!